How to Install Dreambox Control Center (DCC)

Many users seek an easy way to manage their receiver boxes (Dreambox, VU+, or any other box with OpenPli, Enigma2 OpenATV image) via a flexible and feature-rich FTP program. While some might use Filezilla or other FTP clients, we recommend using Dreambox Control Center (DCC), specifically designed for receiver box file management. With DCC, you can manage or install images, plugins, and any other files you need to upload or download from your box. One common task is uploading or editing the CCcam.cfg file.

Steps to Install Dreambox Control Center (DCC)

Click here to download the zip folder containing Dreambox Control Center DCC v2.40.

After downloading, extract the zip folder and navigate to the extracted folder and open DCC
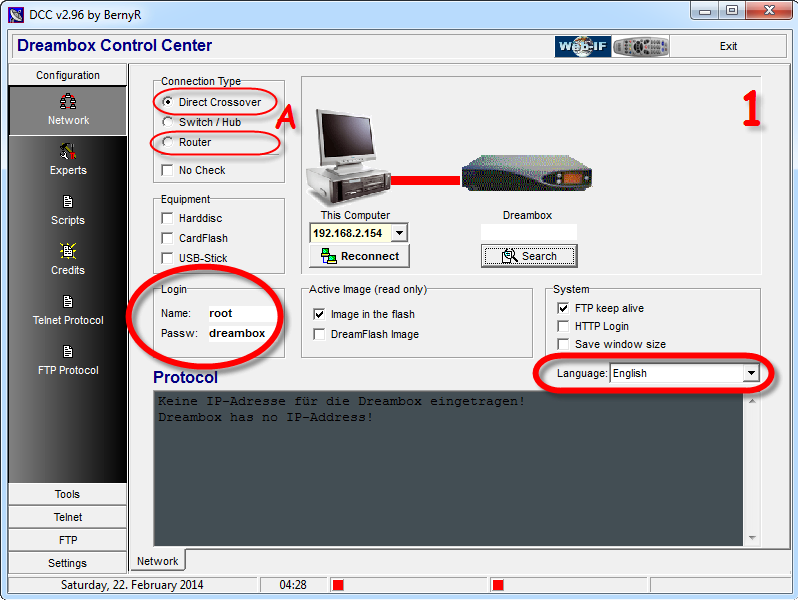
Een screenshot van de Dreambox Control Center-software-interface. Er worden verschillende opties weergegeven, waaronder verbindingstypen (Direct Crossover, Switch/Hub, Router). Inloggegevens (Login: root, Wachtwoord: dreambox) en taalinstellingen zijn rood gemarkeerd. De interface ondersteunt ook cccam-configuratie.

1.First assign your box user/pass then the preferred language. Connection Type must also be chosen.

Note: If you connect to your box directly from your laptop/pc choose “Direct Crossover” but a router is on the way “Router” must be chosen.
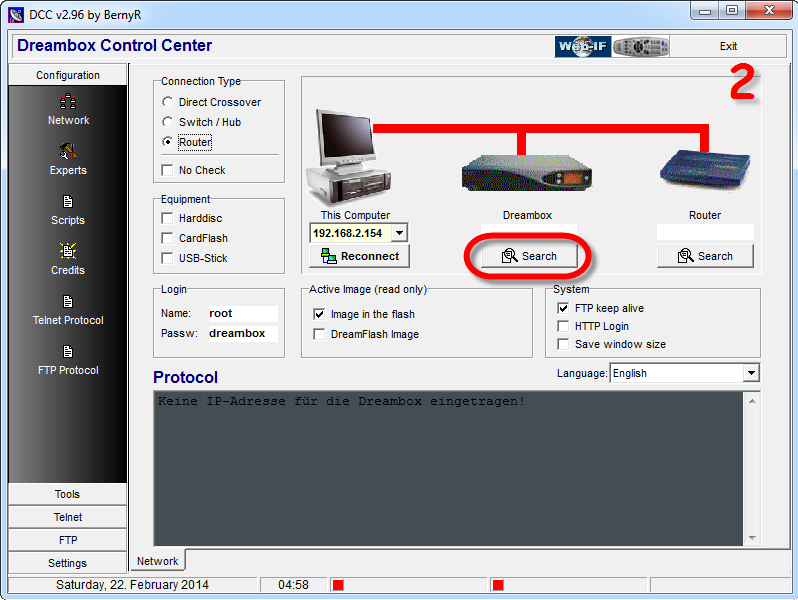
Schermafbeelding van de Dreambox Control Center-software-interface. Het toont verbindingsinstellingen voor een Dreambox en router, met opties om naar apparaten te zoeken en opnieuw verbinding te maken. De interface bevat aan de linkerkant tabbladen voor configuratie, netwerk, tools en protocol, met gedetailleerde verbindingsspecificaties, waaronder CCcam-instellingen.

2.Now you need to assign the proper IP Address of each device.

Note: If you know the correct IP address of your box and router, there is an empty space above the Search button. Mouse over there and type the IP address.

If you don’t know the correct IP address, click on Search and let the Dreambox Control Center DCC scan and find the correct IP addresses.

Now I`m going to scan for the right IP address of my box. I click Search
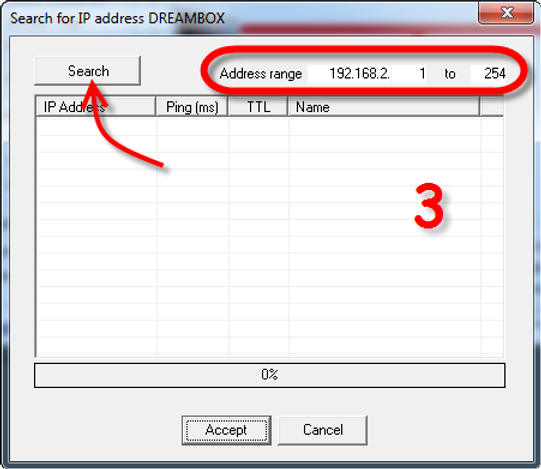
Er wordt een dialoogvenster met de titel "Zoeken naar IP-adres DREAMBOX" weergegeven, met een knop "Zoeken" en een adresbereik van 192.168.2.1 tot 192.168.2.254. Het vak bevat kolommen voor IP-adres, Ping (ms), TTL en Naam, met daaronder ruimte voor cccam-gegevens.

3. At the top you can see the Address range where you can assign the range of IP address which your Network is based on.

My range is 192.168.2.1-254. Clicking on search will start the scanning process.
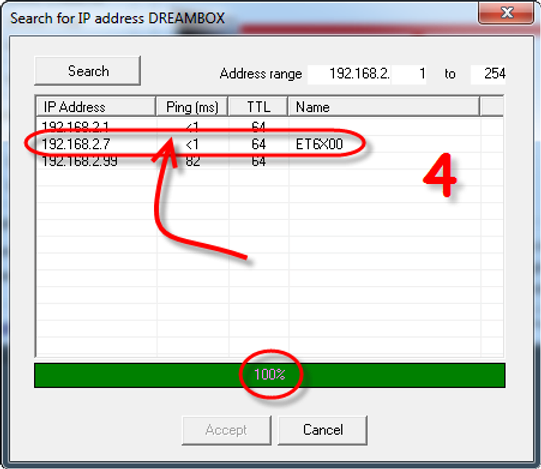
Een venster "Zoeken naar IP-adres" toont een lijst met IP-adressen. Een pijl markeert '192.168.2.7', met 'PING (ms): 1', 'TTL: 64' en 'Naam: ET6X00'. Een andere pijl wijst naar de cccam-vermelding, wat in totaal vier vermeldingen aangeeft. Een groene voortgangsbalk onderaan geeft 100% voltooiing aan.

4. Scanning process is done. 3 IP`s have been found.

the IP ending in 2.1 is my Router, the one with 2.7 is my Box and 2.99 is another device.

So I double click on the second IP in the list to assign it as my box IP in Dreambox Control Center DCC.

Do the same procedure for your Router.
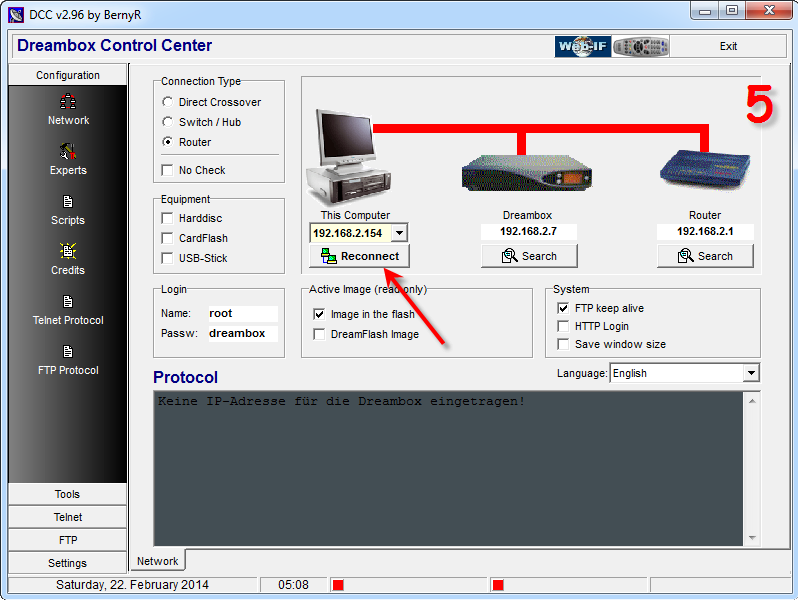
Screenshot van de software-interface "Dreambox Control Center". Het hoofdvenster toont de verbindingstypen, aangesloten apparatuur, aanmeldingspaden en een beeldkiezer waarin 'DreamFlash Image' vooraf is geselecteerd. Hieronder vindt u een protocolfoutmelding in het Duits. De interface ondersteunt ook cccam-configuraties.

5. Now that we have assigned proper IP`s on my device, we`re gonna click on Reconnect to see if it`s working.
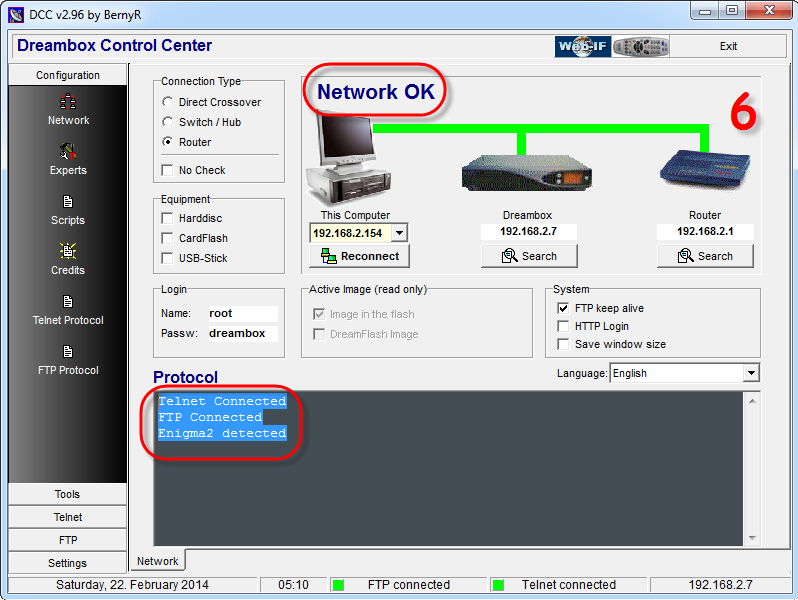
Schermafbeelding van de Dreambox Control Center v2.96-interface met de netwerkstatus als "Netwerk OK" met verbindingen met een Dreambox en een router. Telnet en FTP zijn verbonden, Enigma2 is gedetecteerd en CCCam is actief. Het actieve IP-adres is 192.168.2.7 en de rootgebruiker is ingelogd.

6. All signs show that our connection is healthy and we are connected to our box through our router.
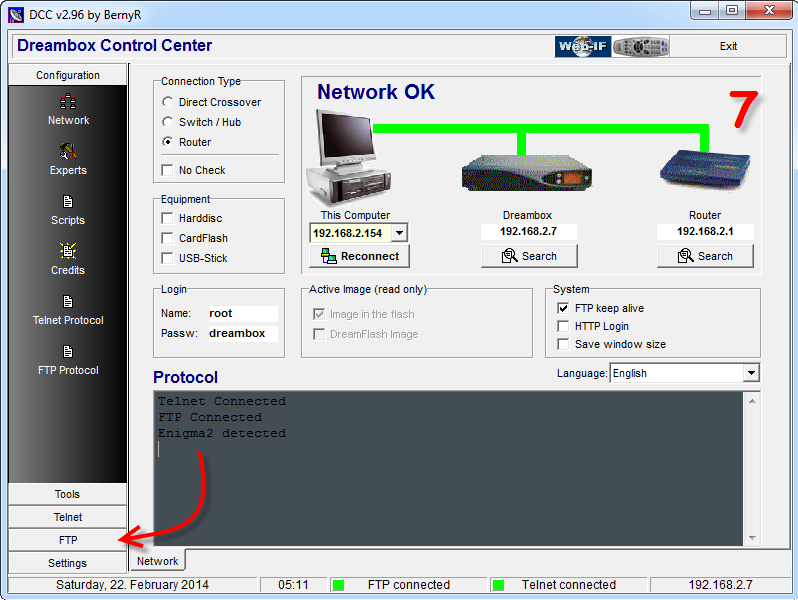
Schermafbeelding van de Dreambox Control Center (DCC)-interface met netwerkinstellingen met de status 'Netwerk OK'. De interface geeft aangesloten apparaten weer: een computer, Dreambox en router. Er worden indicaties weergegeven over de verbinding tussen cccam en FTP. De datum is zaterdag 22 februari 2014.

7. So let`s go to the FTP section and see how we can manage our files between pc/laptop and the box.
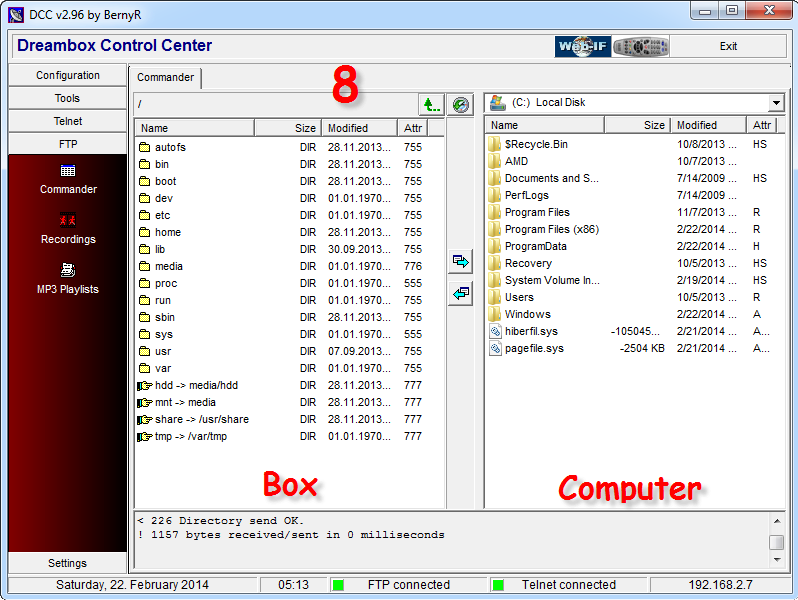
Screenshot van de Dreambox Control Center v2.96-software-interface met CCcam-integratie. Het linkerdeelvenster toont een lijst met bestandsmappen met de naam 'Box', terwijl het rechterdeelvenster lokale schijfbestanden toont met de naam 'Computer'. Boven- en onderaan zijn diverse technische informatie en statusindicatoren aanwezig.

8. As you can see this section is divided into two halves.

Right side is our Receiver box and the left side is our PC/Laptop.

You can simply exchange between these two using the two arrows in the middle.


If you keep DCC folder, each time that you open it, it automatically connects to your box and you can do your edits.

See also: How to make cccam.cfg file