CCCAM
INSTALLEER & GENIET
Stap 1; Download en installeer het programma DCC (Dream Control Center) op uw computer.
Stap 2; Vul het IP adres van uw Dreambox of andere linux ontvangers in en maak verbinding.
Stap 3; Ga via de FTP naar de etc map en klik daarna met de rechter muis knop op CCcam.cfg en klik op “Edit”.
Stap 4; Voer hier uw CCcam line in en klik op opslaan.
Stap 5; Verbind de COAX en/of de satelliet kabel aan de ontvanger.
Stap 6; Restart de ontvanger en veel plezier met kijken!

Internet
Enkel een internetverbinding
Minimale internetsnelheid van 4 Mb/s
Om de CCcam kabel server te kunnen ontvangen
moet u de COAX kabel van uw oude TV provider
aansluiten op de ontvanger.
Uw TV provider hoeft niet actief zijn.
Direct geleverd
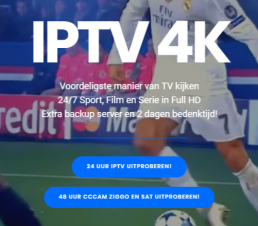
€30 voor 6 maanden of €40 voor 12 maanden, hiermee krijgt u toegang tot alle zenders inclusief alle betaalde pakketen van kabel en satelliet.
U zit nergens aan vast! Geen onvoorziene kosten! Geen stilzwijgende verlenging! U bepaalt wij draaien!
Zeer hoge kwaliteit
Alle pakketten zijn full HD en de 3D en 4K-kanalen zijn van een zeer hoge kwaliteit!
Met CCcam Kabel Abonnement het meeste van het mooiste uwzelf verliezen in een van de prijswinnende top Series en Films, Sport.
Automatische zenderupdate
Alle zenders worden helemaal gratis automatisch ge-update.
Zenderlijst sorteren
Gebruikersvriendelijk vanwege de zenderlijst is gesorteerd volgens land/genre
Hulp bij installatie
Onze helpdesk staat 24/7 voor al uw vragen klaar. Wij leveren al onze producten met 100% installatie garantie.
Hulp op afstand
Hoe het werkt?
Heeft u moeite met de installatie van IPTV service? Dan helpen wij u graag met de installatie van onze IPTV service op uw apparaat.
Stap1: Stuur ons een “Help op afstand verzoek met gegevens van u IPTV apparaat”
Stap2: U krijt via uw email een afspraak en de volgende stappen.
STUUR EEN Help op afstand verzoek

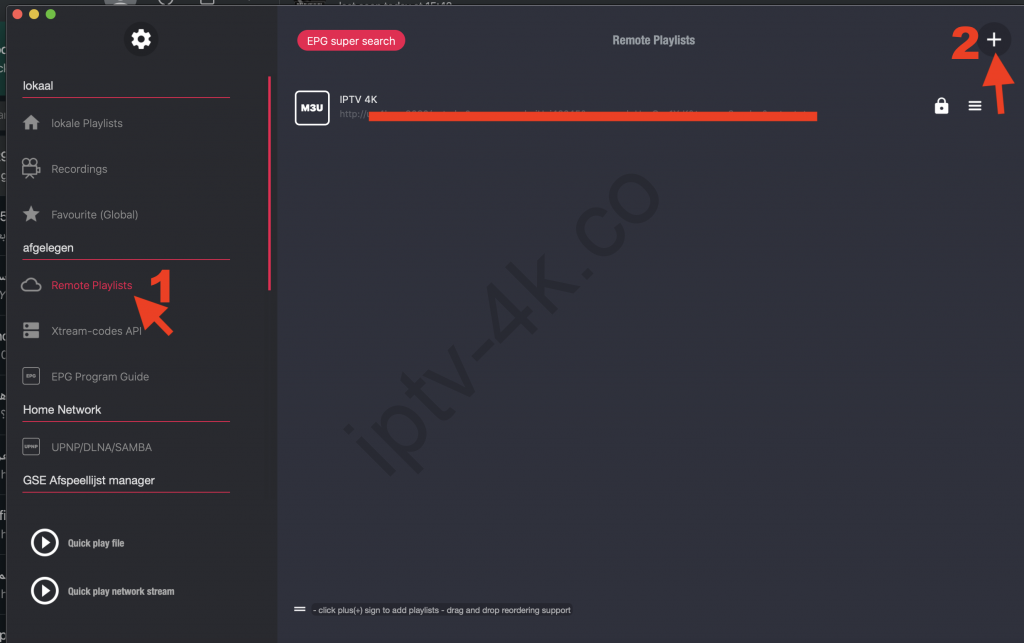
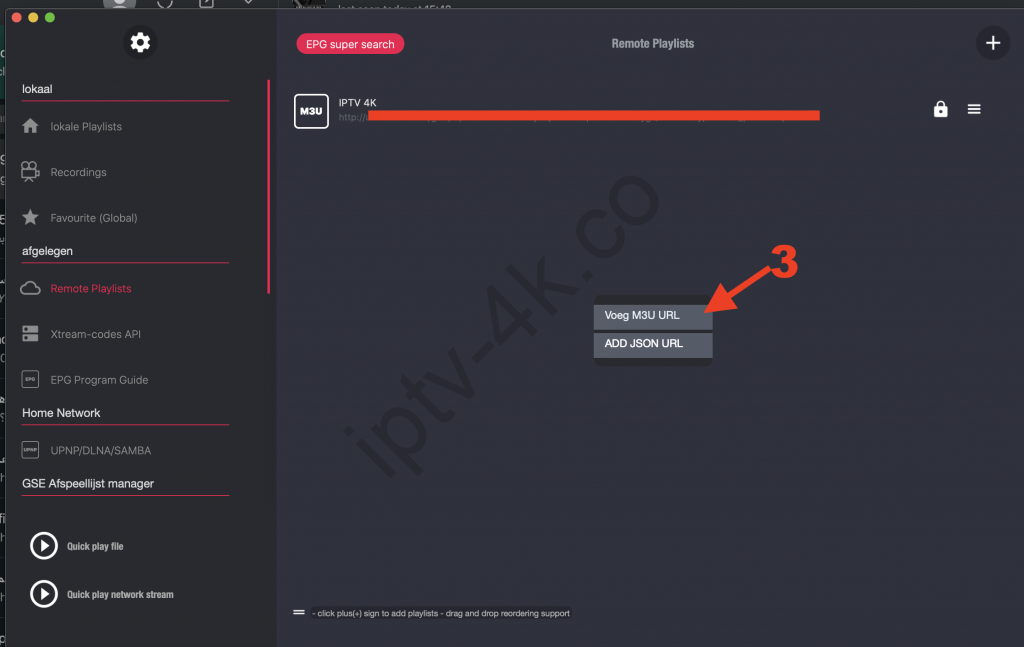
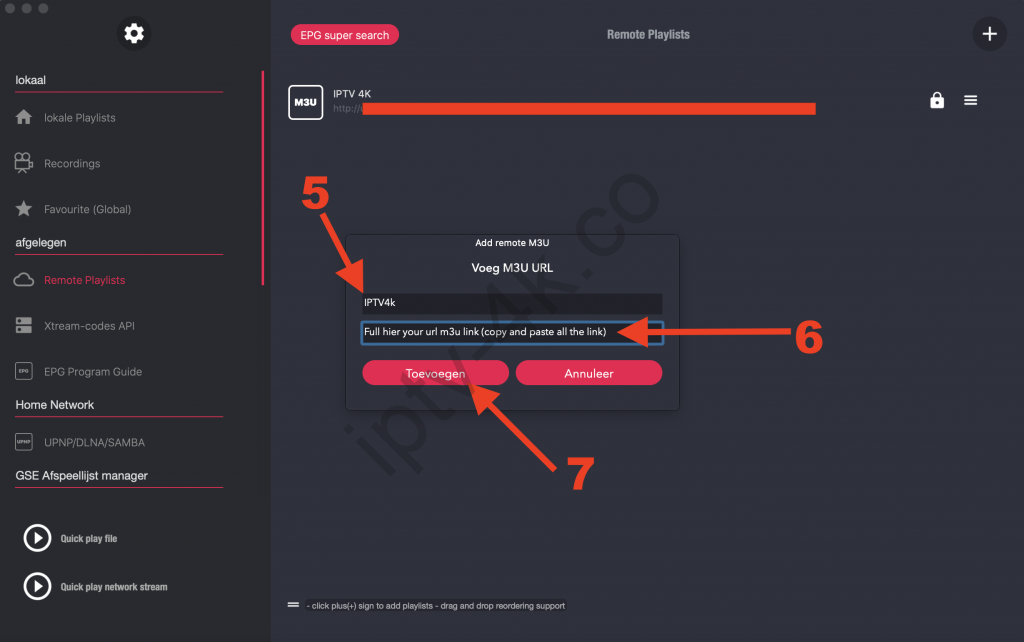
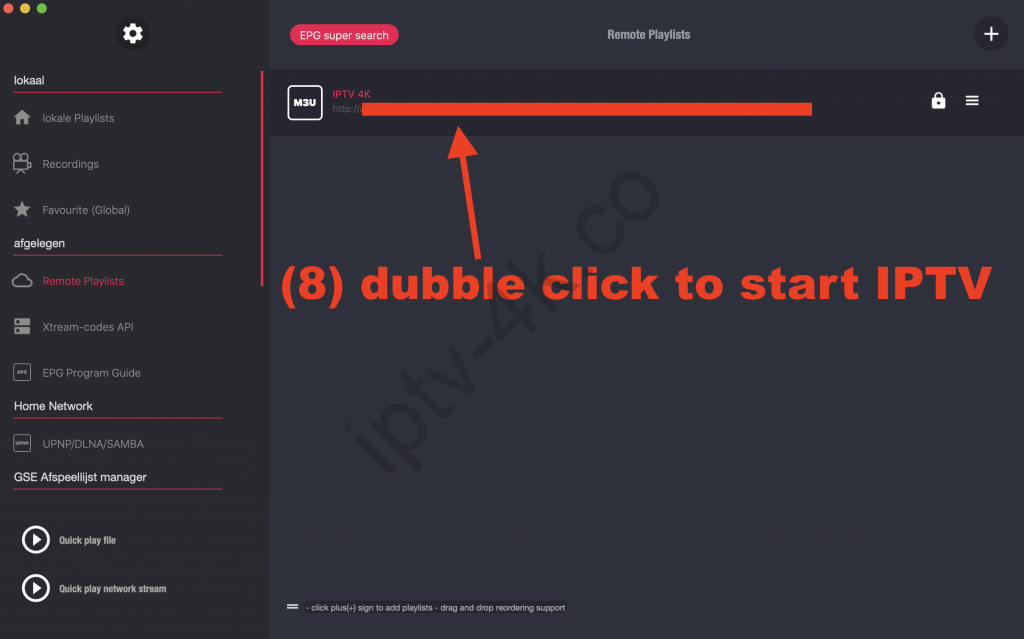
Tutorials
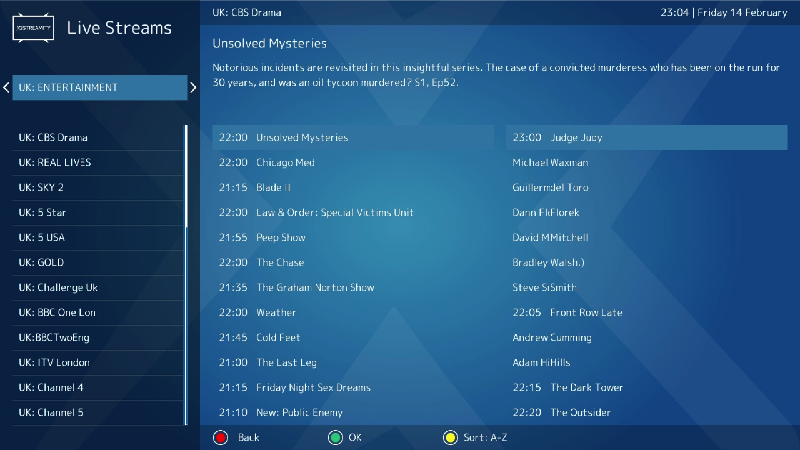
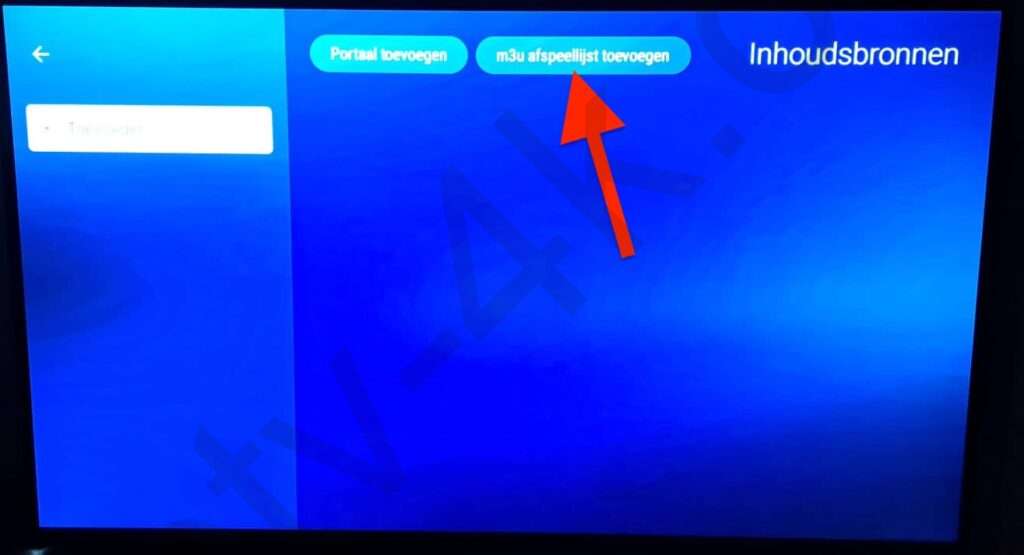
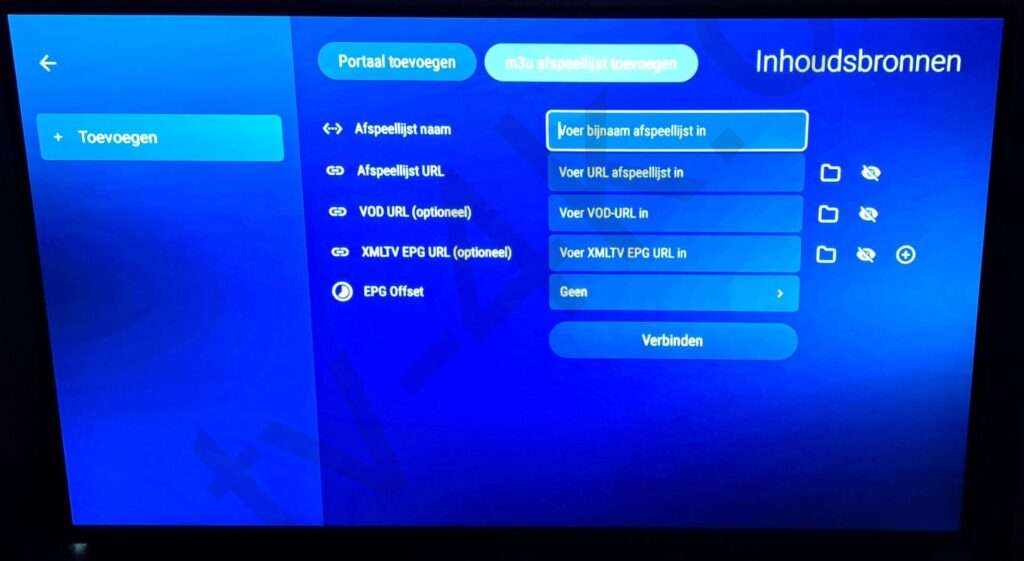
Some IPTV apps like IPTV Smarters and TiviMate use Xtream-Codes method which you can easily find in your url m3u link the URL server address, a port, a username and a password.
For example, this is a format of url m3u link:
http://your.url.address:NUMBER/get.php?username=YOURUSERNAME&password=PASSWORD&type=m3u_plus&….
So your Xtream-Codes are:
URL: http://your.url.address:NUMBER
USERNAME: YOURUSERNAME
PASSWORD: PASSWORD
* Also you can find your Xtream-Codes in your activation email or use here our automatic converter tools.
De voordelen van Xeev zijn:
- je kunt helemaal zelf bepalen welke groepen en welke zenders in die groepen je wel/niet wilt zien;
- Je kunt groepen & zenders hernoemen (al was het maar om een gewenste sortering te forceren);
- Je kunt zelf nieuwe groepen aanmaken en zenders verplaatsen of kopiëren van de ene naar de andere groep;
- Je kunt zelf EPG toewijzen (niet 100% maar wel 95% matcht) óf je kunt de EPG van de provider gebruiken. Dit was erg handig bij de huidige storing: hún EPG funktioneerde nl. perfect;
- Je kunt kiezen voor picons (zender-icoontjes) van de provider, van Xeev zelf óf je kunt zelf een url naar een plaatje opgeven. Dit kun je per zender doen.
- Je kunt VOD (films & series) laten koppelen aan tMDB, voor omschrijvingen en posters;
- Je kunt abo’s van meerdere providers combineren tot 1 lijst;
- Ze hebben een eigen Enigma2-plugin. Hierbij nog een tip: als je ervoor zorgt dat de zenders van je IPTV exact dezelfde naam hebben als die van je satellietkanalen, kun je forceren dat voor IPTV dezelfde picons gebruikt worden als voor de satellietkanalen.
- Alles blijft automatisch synchroon.
Ga naar de website van XEEV Playlist Editor
Of probeer deze andere free m3u playlist editor (VOD and Series are not supported): http://m3u4u.com
TiviMate IPTV Player is an Android base application which can use to watch IPTV. It supports both Remote playlist and Xtream codes system.
Tivimate is a common app on Firestick to stream IPTV channels.
Here we are going to check how can we add IPTV channels on TiviMate IPTV Player via Xtream codes.
And at the end of article we will review some useful feature on app like Catch-up, Recording, Subtitle and etc.
Setup Tivimate IPTV Player via Xtream Codes API
Step 1: First of all download and install app from here:
https://play.google.com/store/apps/details?id=ar.tvplayer.tv
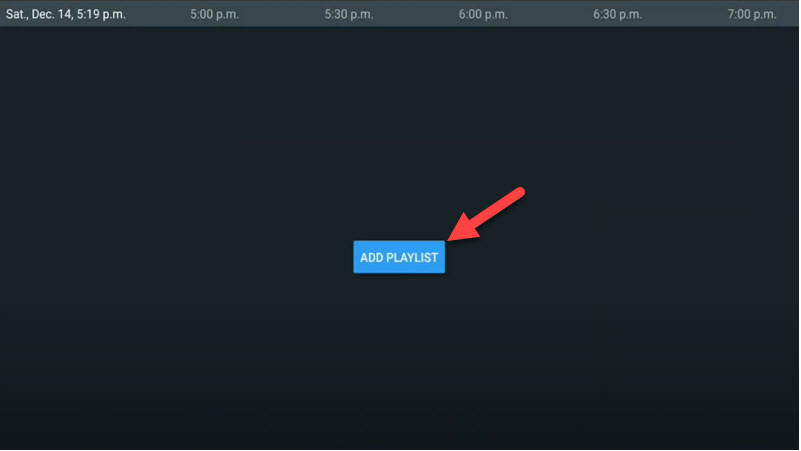
Step 2: After open Tivimate click on “ADD PLAYLIST“.
Step 3: Click on “Xtream Codes login” and them Next.
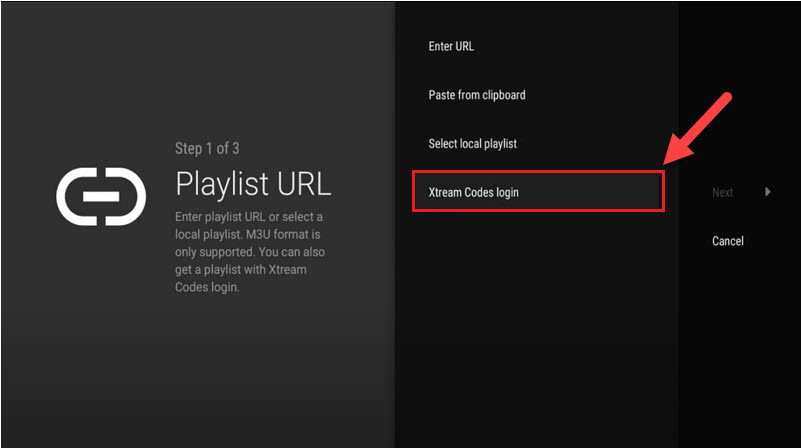
Step 4: In this step you need to add Server address, Username and Password which can be found on your M3U url.
The progressive IPTV providers give you a dashboard which you can access your M3U url in dashboard.
How to find Server Address, Username and Password?
If you want to have VODs too, mark “Include VOD” .
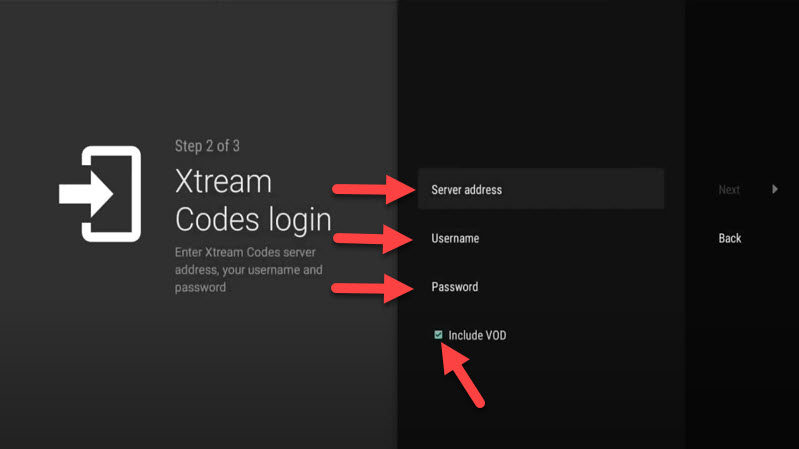
Go on and the channels will appear after a while.
Features on Tivimate IPTV Player
You access many different useful features on Tivimate, we are listing some of them:
• Modern user interface designed for big screens
• EPG – Scheduled TV guide update
• Auto-start on Boot
• Favorite channels
• Picture-in-Picture
• Catch-up
• Record
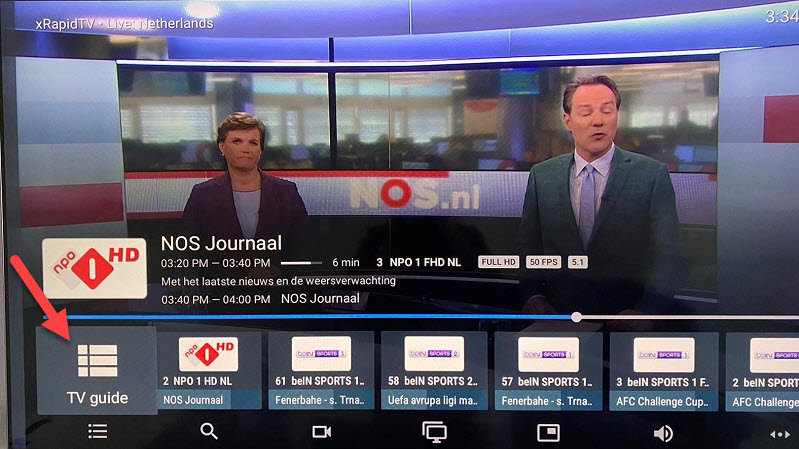
After you open channel you can see this view, you can access EPG by click on “TV guide“.
By holding the “OK” button for 2 seconds you can see the setting menu, here you can see many features like Recording.
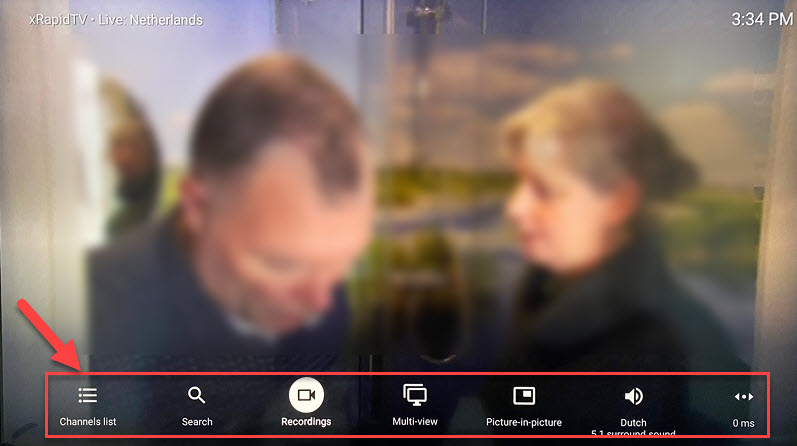
Scroll right a little and you will see other options like subtitle enable “CC” or “Add to Favorites” .
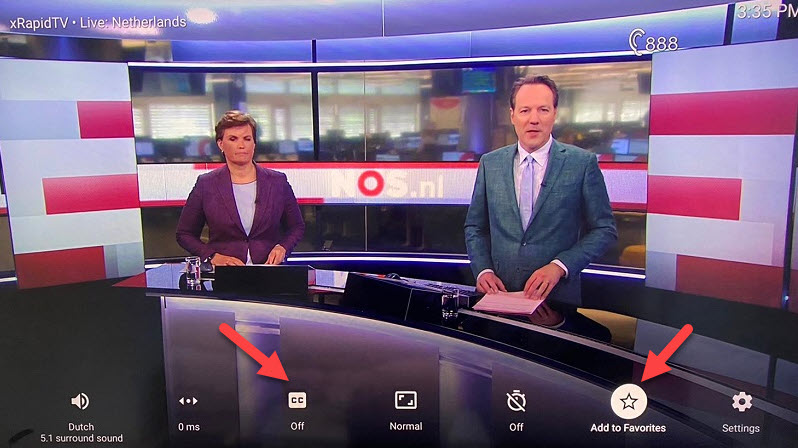
At the end right click on “Setting” to see more options.
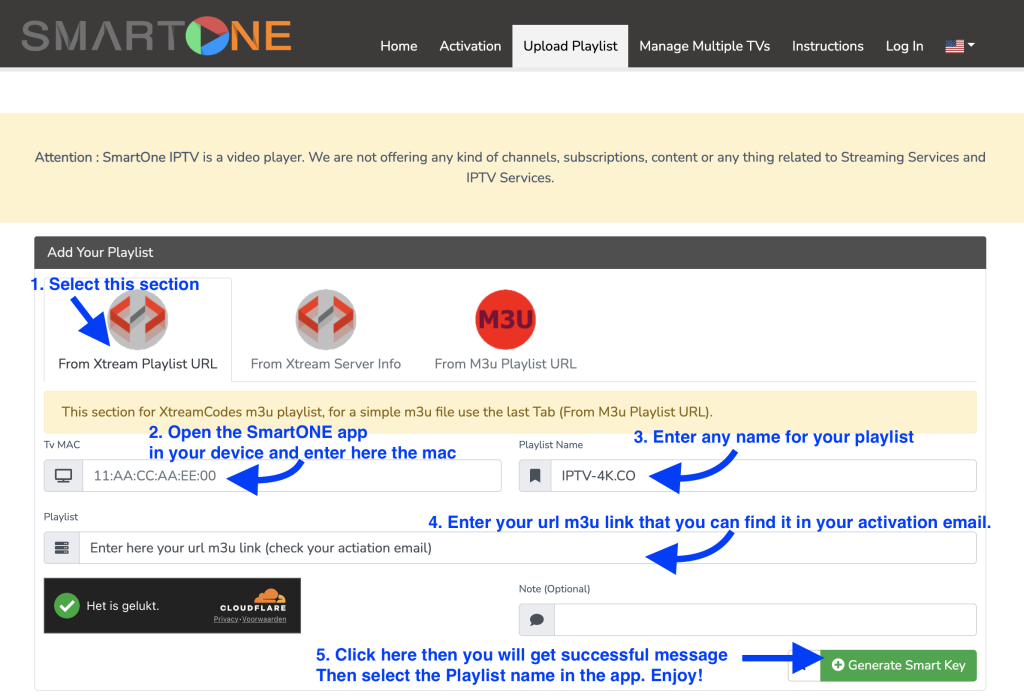
Install the SmartONE IPTV app in your IPTV device and send your url m3u link to the app via this link:
https://smartone-iptv.com/plugin/smart_one/main_generate
Fellow this 5 steps:
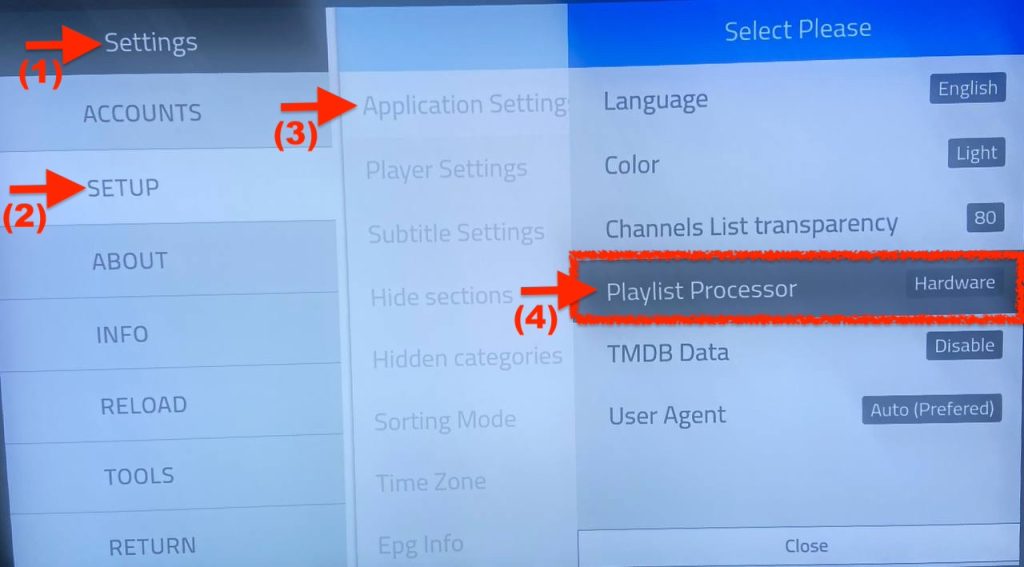
Important: Do you have extreme picture problems then open SmartONE IPTV app then go to Settings then SETUP then Application Settings then Playlist Processor and change it form Software to Hardware (or vicevice versa) then close and save and try. See the photo:
Click here if you need more help with instalation or using the app
Volg deze tutorial:
Setup instruction for a Samsung/LG Smart TV or Amazon Fire Stick. IPTV4K service uses a media controller app called ‘Smart IPTV’, this app is free to use for a period of seven days, you will then be asked to make a one-time donation of € 5.49 (Euros) towards the Smart IPTV app development.
- In order to check if your Samsung/LG Smart TV or Amazon Fire Stick is compatible with the IPTV 4K Service go to the Samsung or LG Smart TV app store screen and search for the ‘Smart IPTV’ app. If the app is not displayed on the main screen you may have to search for it in ‘All Apps’ or ‘Updates’. Please fellow this link for new Samsung TV: https://iptv-4k.co/warning-samsung-removes-smart-iptv-do-not-rest-your-tv/
- Launch the ‘Smart IPTV’ app. If you app still trial version then please pay it here: https://siptv.app/activation/
- Make a note of the ‘MAC Address’ which is displayed on the screen.
- Go to http://siptv.eu/mylist/ from any web browser.
- Go to the section ‘Add external playlist links (URLs)’ and enter your ‘Mac’ address and the unique IPTV4K subscription URL into the ‘Link’ field.
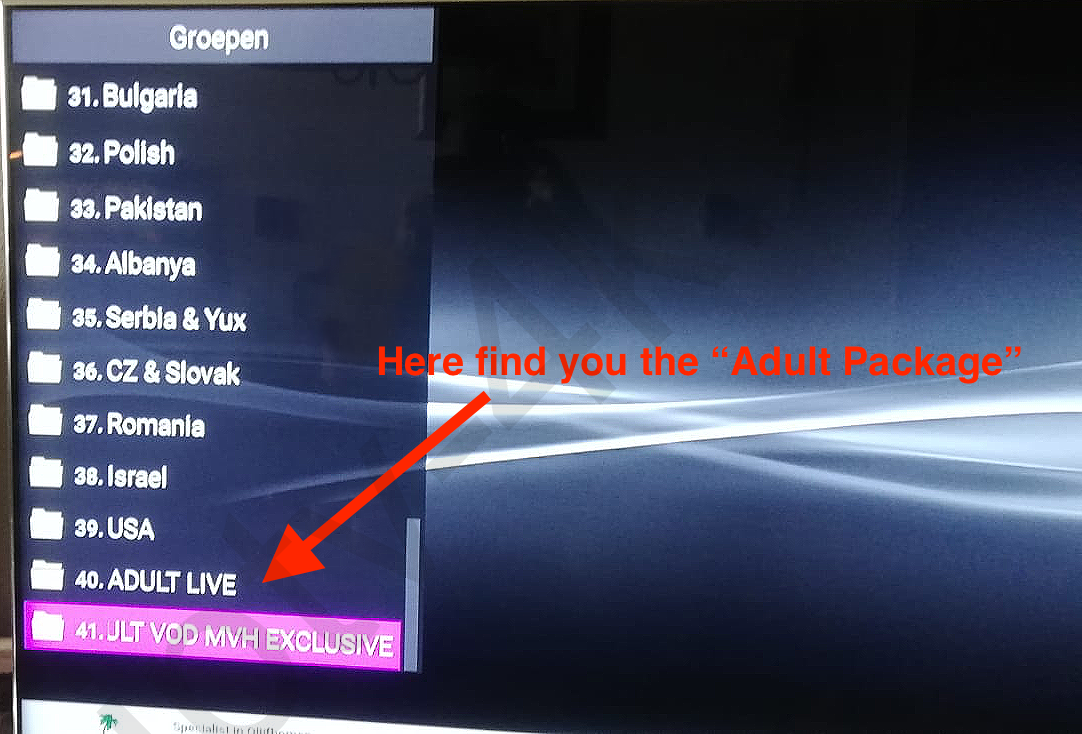
- If you have ordered Adult package then click on sign (+) and enter your second Adult URL m3u link.
- Select ‘ExUSSR’ , ‘logos‘.
- Check in the ‘Save online’ and ‘Detect EPG‘ checkbox.
- Click on I’am not a robot
- Click on Send. You will see successfully message
- Restart the ‘Smart IPTV’ app or TV.
- Tips: Press the blue button on your remote control to to view channel groups (country list)
If it still not working then delete the Smart IPTV app and re-install it.
Please note that the channels in the video tutorial is not from our server.
Please don't use simple password like 0000 or 1234
Video tutorial: GSE Smart IPTV PRO
Install de app in your MacOS via Apple Store. It is trial version and you can buy it from the app or Apple store.
Start the app and fellow this steps:
Video tutorial: IPTV Smarters App
Install IPTV Smarters app in uw IPTV apparaat en follow all steps:
Open IPTV Smarters app and follow all steps in the photo’s:
STEP 1: Add by Name IPTV4K
STEP 2: Select M3U URL option.
STEP 3: Enter your URL M3U link. We send this URL M3U link to your email after you buy IPTV subscription from our website.
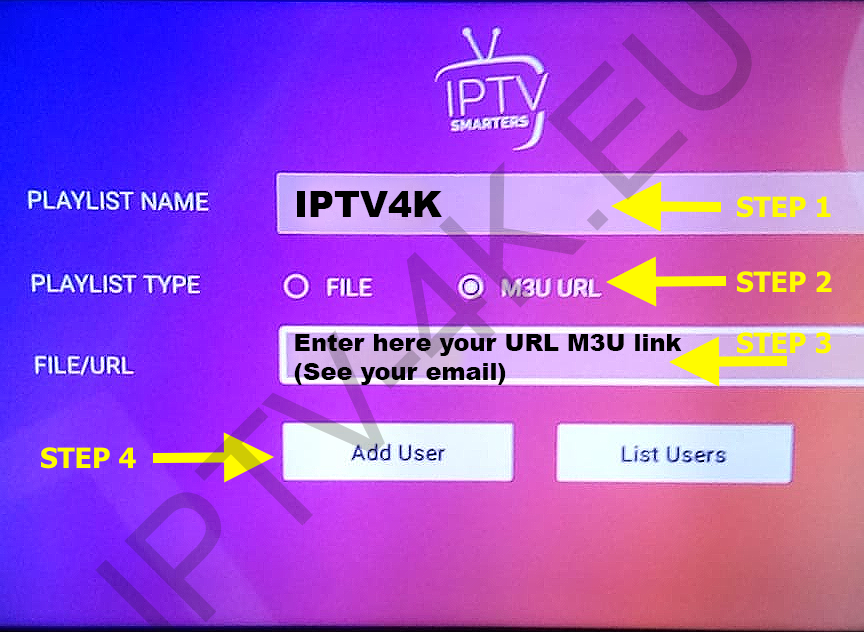
STEP 4: Click on “Add User” button.
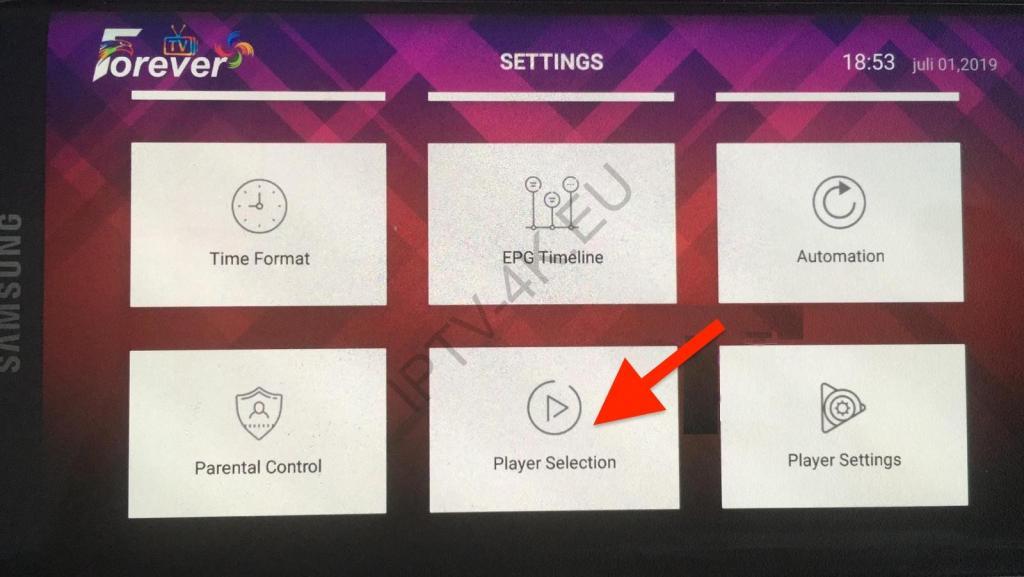
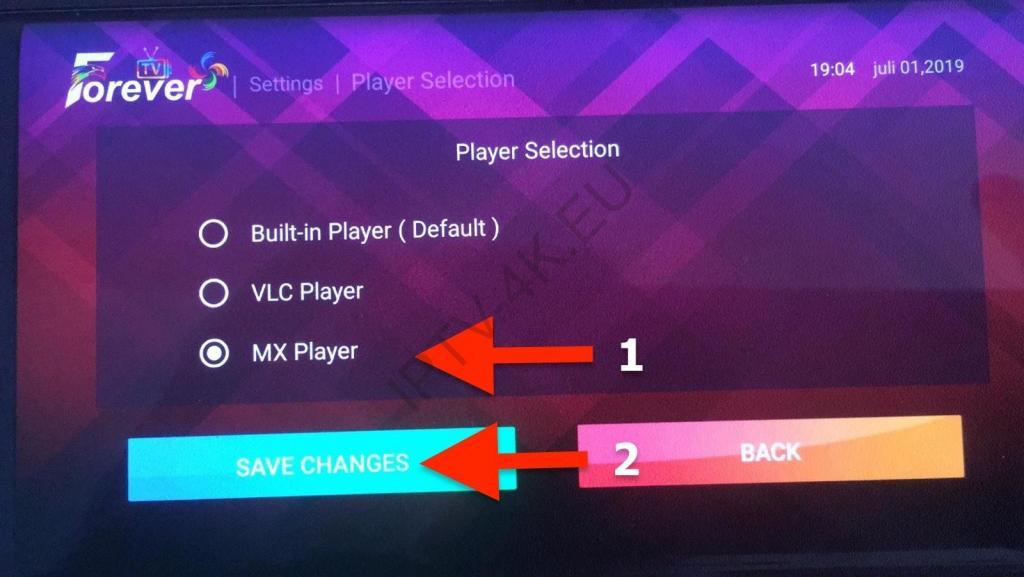
STEP 5: Go to Settings then Stream format and select MPEGTS (.ts) then Save Change

Just for Android App: Go to Settings then Player Selection and select MX Player then Save Change.
Select Install EPG to active it
Tips: Some times you must refrash refresh the channels list
Enjoy watching!
Deze app is heel goed maar helaas het is niet meer beschikbaar in de app store en gaat de app developer niet meer het updateren. Zie app website voor meer informatie: https://www.duplexplay.com
Go to Google Play store and download Perfect Player IPTV
Please follow all 11 steps
1 – Open Perfect Player

2 – Go to Settings

3 – Now you are into Settings Page, Go to General

4 – Go to Playlist and enter Your URL (See your email) and add by Name IPTV4k after you done click on OK
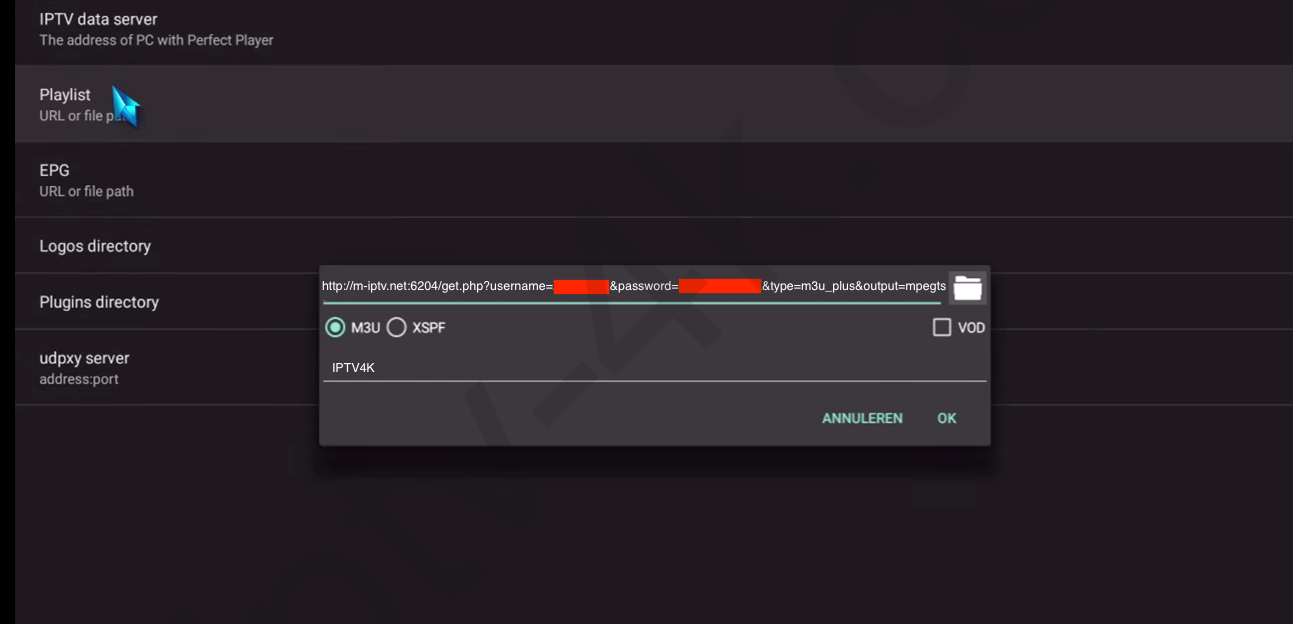
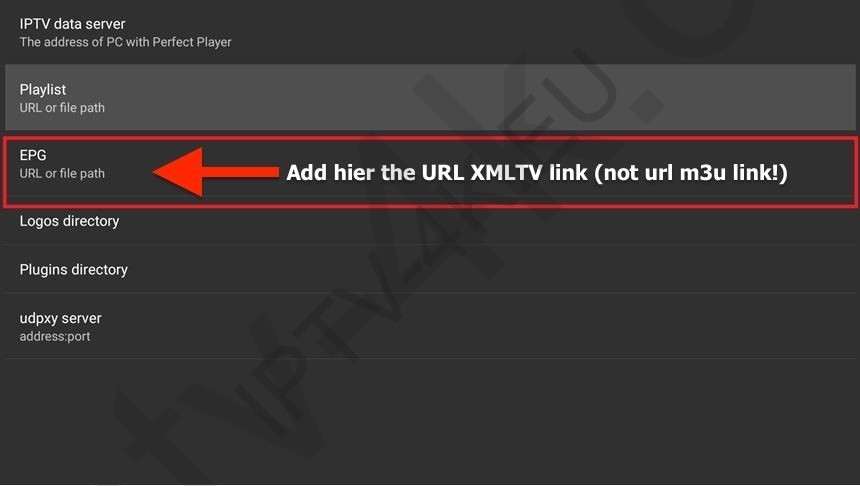
Option: If you want add EPG to the channels then go to EPG and add your EPG URL XMLTV link. You can convert your url m3u link to url XMLTV link hier: https://iptv-4k.co/epg/
5 – Go back to your Settings Page and go to Playback

6 – Check ONLY change system volume
7 – Go back to your Settings Page and go to GUI
8– Check ONLY Show channels as group folder
9 – Restart Perfect Player
10 – Now you see channels list on the left side
11 – Press left the button on the remote controller now you have all channels on group folder
12 – Go to any folder and enjoy to watch all channels
IMPORTANT NOTICE:
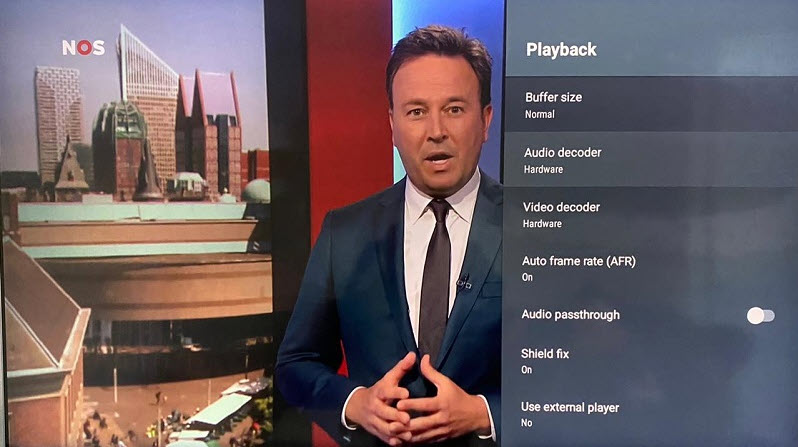
If working some channels without audio then go to to Decoder and select Hardware. And if all or some of my channels do not play or have playback issues (Android) then select different Decoder type in Settings (Playback->Decoder).
If you see notification message, the app must be restarted to apply changes.

Troubleshooting
If you have any problems viewing the Channels please follow this recommended fix:
Restart the App (PerfectPlayer), and Wi-Fi Router.
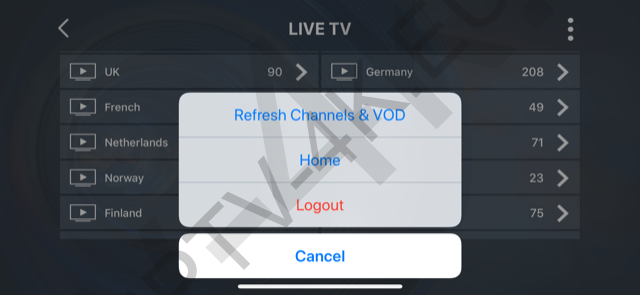
Did you ordered the “Adult IPTV package”? Then follow please this steps to add the url m3u link (adult package) in Playlist 2.
1. Full in Playlist 2 your url m3u link of Adult zenders (see your activatie email). Please if you don’t order “IPTV Adult Package” then skip this steps!

2. Press OK to get this menu then select “Kies Playlist”
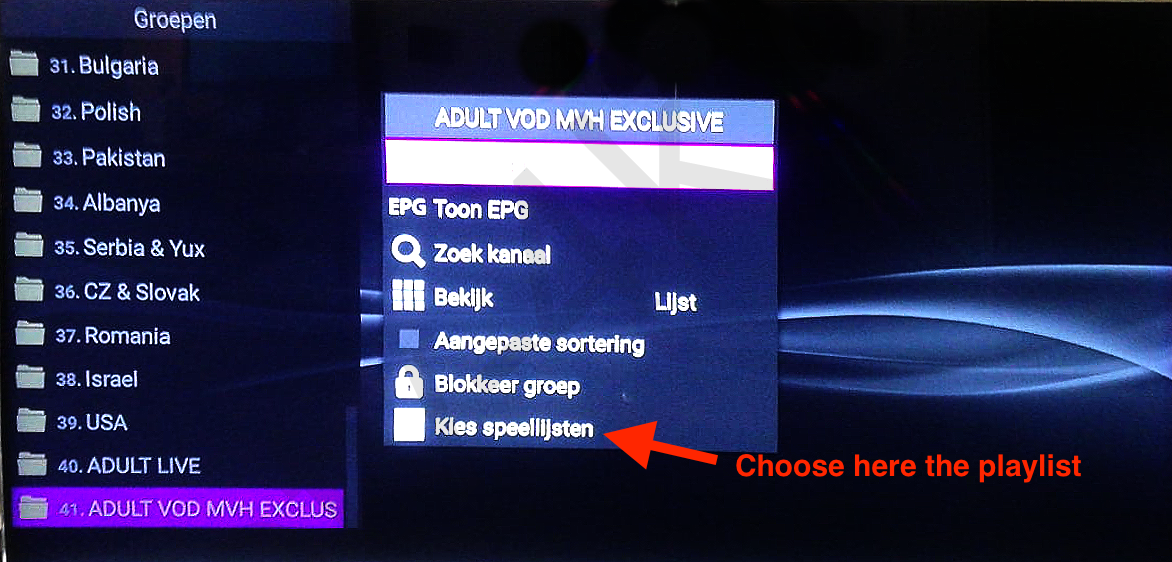
3. Select both Playlists
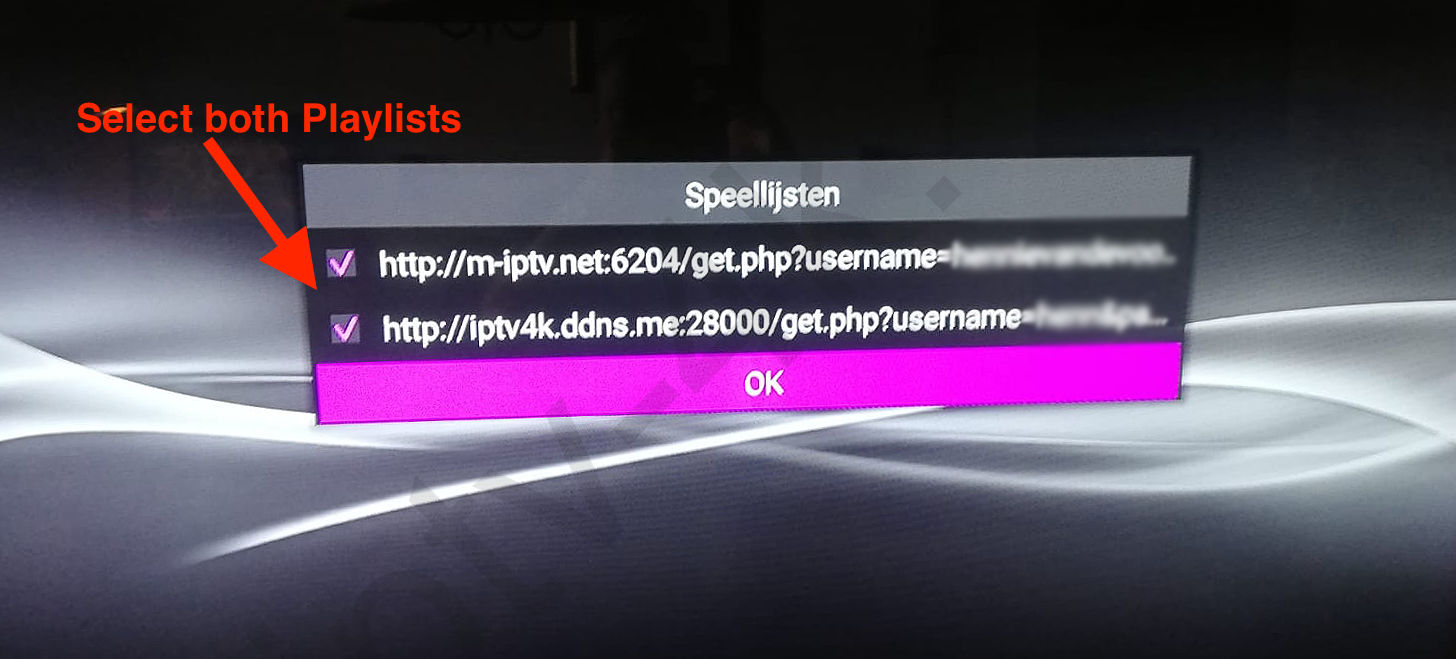
4. You will find the adult channels group.
Troubleshooting
If you have any problems viewing the Channels please follow this recommended fix:
Restart the App (PerfectPlayer), and Wi-Fi Router.
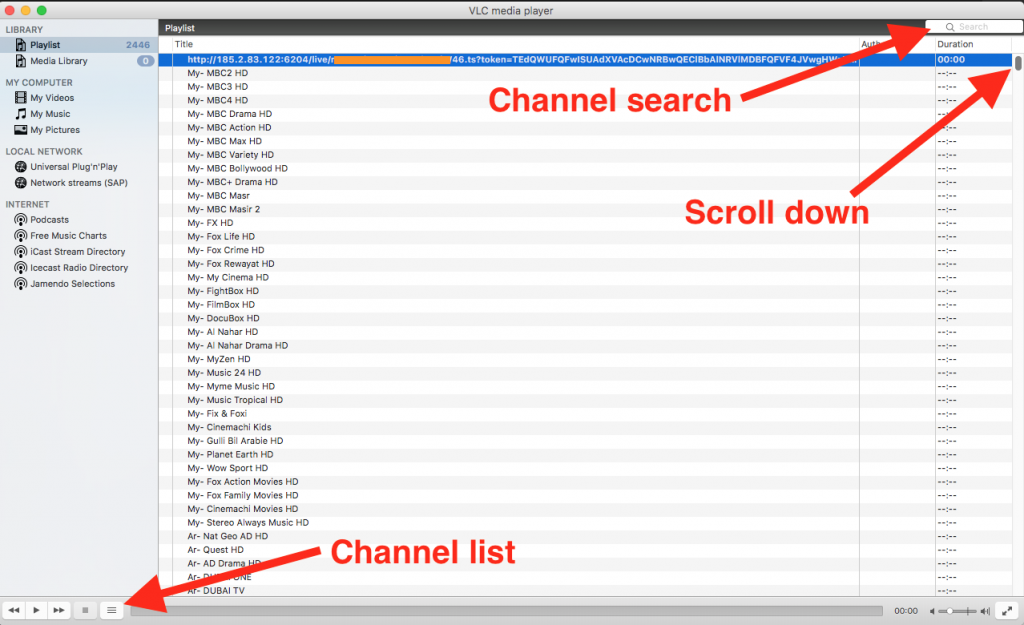
IMPORTANT: VLC Player will not working if your channel list is big so please use https://www.smplayer.info or IPTV Smarters Pro
1- Download VLC ( Download URL https://www.videolan.org/vlc/index.html)
2 – Open VLC Player
3- Go to Media -> Open Network stream.
4- Add your Subscription URL we sent to you and press play
5- Wait till all the Channels load (this may take some time)
Choose a Channel and enjoy the show
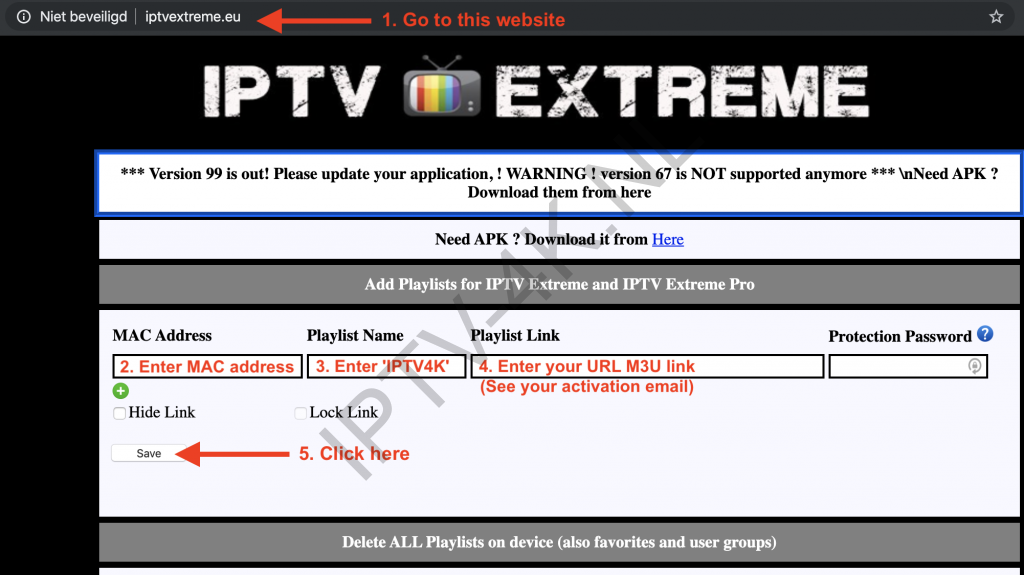
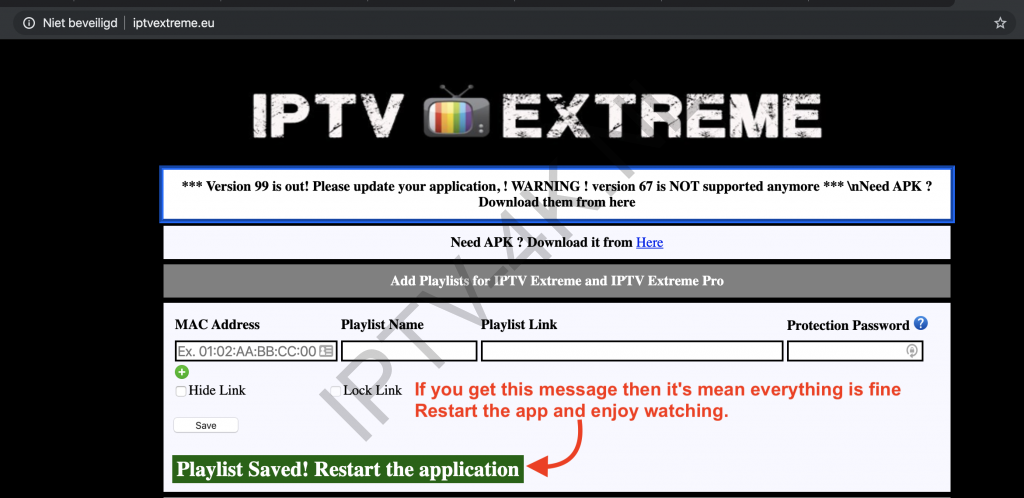
1- Go to this website: http://iptvextreme.eu/ and install the app in your device.
2 – Enter The mac address (Open the app in your device to fine your mac address).
3- Enter ‘IPTV4K’ in Playlist Name.
4- Enter your URL M3U link in Playlist Link (See you activation email).
5- Click on Save then you must get ‘Playlist saved! Restart the application’ message.
Choose a Channel in the app and enjoy the show.
MyIPTV Player on Windows Phone, Windows10, and Xbox One
arrow_forward
This is an exceptional media player with EPG to play your IPTV channels on your Windows Phone, Windwos10, and Xbox One. You can simply load your M3U playlist from your url m3u link.

You can download this app via the link below:
https://www.microsoft.com/en-us/p/myiptv-player/9pjj2nmbf0tr
MyIPTV Player App features
- HTTP Live Streaming (HLS) and MPEG TS supported
- Channels are automatically grouped based on channel data
- EPG support built-in – Recording option for channels
- Favorites management built-in
- Multiple channel playlist supported
- Download video on demand (VOD) streams
- Download center and history for VOD files
- Channel filtering options – PIN protection
- Media player option which could use VLC library for media playback or Windows 10 media player
- Option to add channels manually in app settings
How to add IPTV channels to MyIPTV Player App
Step 1: Start by downloading the app from the Microsoft store, Xbox live store, or Windows phone store and start the application once it is downloaded.

Step 2: Go to the “Settings” and select “Add new playlist and EPG source” and proceed to the next step.

Step 3: Now on the “Remote Channel List section“, in the first field, enter a name for your playlist: IPTV4K and in the second field insert your M3U playlist URL. Now click on “Add remote list” and proceed to the next section.

Step 4: Now head back to the settings section again and on the Select channel playlist section and select the playlist you just added: IPTV4K and click on “Refresh“.

Step 5: Now click on the “Channels” tab and in here you can start watching the channels you just added to your MyIPTV Player App.

How to Setup PVR IPTV Simple Client Kodi Krypton 17
Open Kodi
Go to the top left side / PVR & Live TV settings.
Click on the General tab and right-click on Clear data
Go to the Guide tab and right-click on Clear data to clear-refresh the database.

Select TV

Select Enter add-on browser

Select PVR IPTV Simple Client

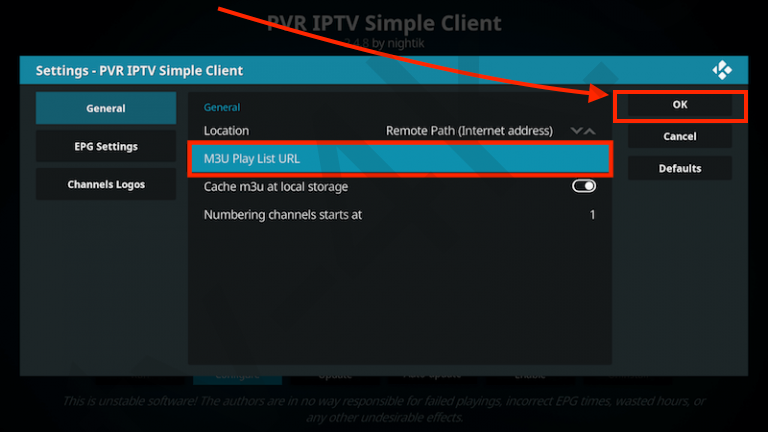
Select Configure

Select General
Very important: Turn off ”Cache m3u at local storage”

If you have your subscription m3u URL set Location to Remote Path

Then Select M3U PlayList URL

Enter the URL of your M3U PlayList and select OK
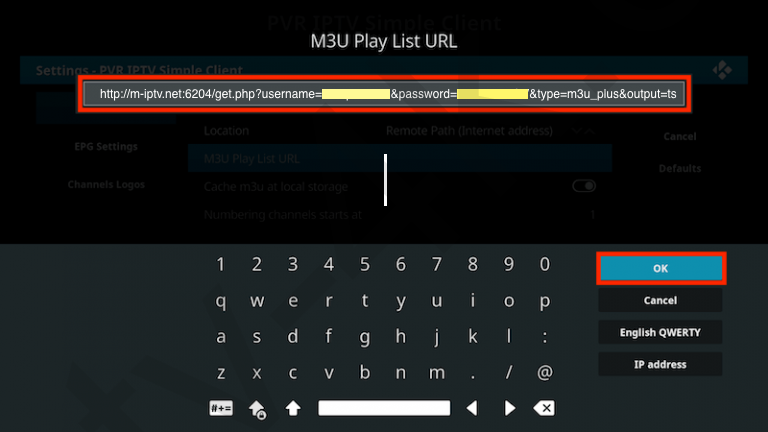
Select OK
Very important: Turn off ”Cache m3u at local storage”
Select Enable

Wait for notification of channels loaded

Now when you go back to the Home Screen and select TV it should look like this

Video Tutorial
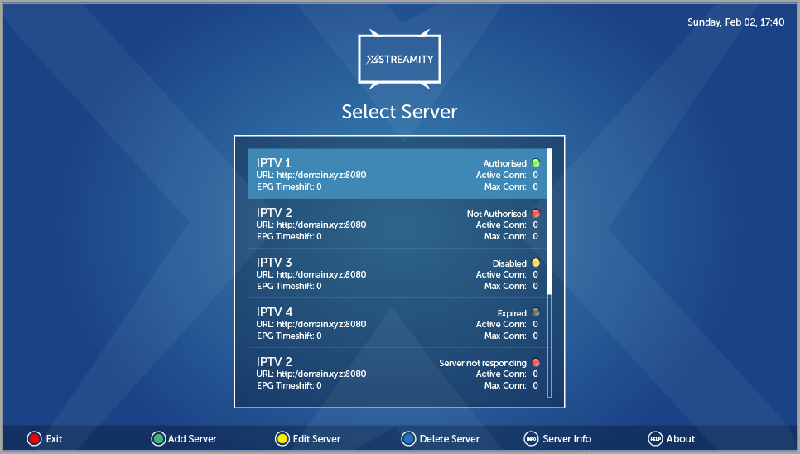
1- Go to your Enigma2 and get your IP address
Go to Settings/Setup/System Network Device Setup Adapter Settings
And get your IP address it starts with 192.168….
2– Go to your windows PC and download here DCC Software
3. Follow this video tutorial: – Note: If you get an error or any problem then delete all IPTV bouquets from the Channel List and I delete the iptv.sh from the box then restart your box –
Wilt u EPG toevoegen voor uw autoscript methode? Dan volg dit stappen (Bedankt voor onze klant Imre!) :
- Factory reset je openpli (iptv-4k configuratie wissen)
- Doorloop setup en stop als de wizard wil beginnen
- Installeer bij extensions Cccam en epgimport
- Start telnet naar je device
- Ga naar de home directory van user root (cd /home/root)
- wget https://github.com/su1s/
e2m3u2bouquet/releases/ download/v0.8.2/enigma2- plugin-extensions- e2m3u2bouquet_0.8.2_all.ipk - wget https://github.com/su1s/
e2m3u2bouquet/releases/ download/v0.8.2/e2m3u2bouquet_ v0.8.2.zip - unzip e2m3u2bouquet_v0.8.2.zip
- opkg install enigma2-plugin-extensions-
e2m3u2bouquet_0.8.2_all.ipk - opkg install ntpdate
- nano /etc/default/ntpdate
- Vul in:
NTPSERVERS=”pool.ntp.org“
UPDATE_HWCLOCK=”yes” - mkdir -p mkdir /etc/enigma2/e2m3u2bouquet
- mv e2m3u2bouquet.py /etc/enigma2/e2m3ubouquet
- chmod +x /etc/enigma2/e2m3ubouquet/
e2m3ubouquet.py - Reboot het system
- Vind uw url m3u link in activatie email die hebben al naar uw email gestuurd met autoscript.
- Genereer epg link van m3u link op pagina: https://iptv-4k.cc/epg/
- Telnet weer naar het systeem
- Type in cd /etc/enigma2/e2m3ubouquet
-
- Reboot het systeem weer.
- Ga op je systeem via de afstandbediening naar menu, plugins, epgimport
8. Kies blauw (sources)
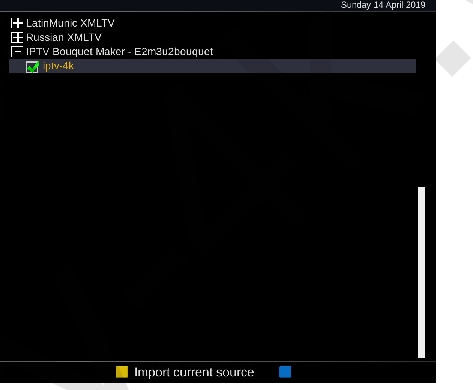
9. Scroll naar beneden, selecteer e2m3ubouquet en activeer iptv-4k
10. Druk op geel (Import current source)
11. Als de initial import meer dan 0 events bedraagd, zijn stappen 1/tm 11 succesvol.
12. Maak het permanent
-
- Telnet naar je systeem
- nano /usr/bin/enigma2_pre_start.sh
- Plak het commando uit stap 7-a-i (python e2m3u2bouquet.py -n iptv-4k -m “[JE M3u URL]” -e “[JE EPG URL]” -P -q [PICON PAD] -i -M) in dit bestand en sluit af
U kunt ook hier extra informatie vinden en plugin update : https://www.suls.co.uk/enigma2-iptv-bouquets-with-epg/
Word er wel EPG getoond maar is paar uur verschoven? Dan volg deze link op het op te lossen. (Bedankt voor onze klant K.):
https://forums.openpli.org/topic/83952-epg-time-2-hours-offset/#entry1359132
berichtje 9 tegen.
_______________________[begin quote]____________________________________________________________
From the files you have send me, I think I know now what is happening.
The utility you are using, is raping our files.
And there is absolutely no need to.
1. In the /etc/epgimport there should be only 2 files (for the moment.)
The first is the rytec.sources.xml file.
the second is the custom.channels.xml file.
I think the rytec.sources.xml file is present. If not download it from here: https://github.com/d…Gimport-Sources
For the second file rename simply the file jmx.IPTV.channels.xml to custom.channels.xml
remove any other file from this folder. (Of course you can chose to move them to a secure location, if you afraid to delete them)
2. Import the normal Rytec sources.
All your IPTV channels should have the correct EPG
PS: When using the custom.channels.xml file, EPGimport makes automatically use of it, and links your IPTV channels (generated by jmx) to the EPG.
It is possible jmx has made wrong links, but we will cross that bridge when it happens.
____________________________[einde quote]_______________________________________________________________
Het gaat dus om custom.channels.xml in de /etc/epgimport directory
This plugin support EPG, Fav. list and groups. Please fellow this instruction (you can find also video tutorials in YouTube).
https://www.sat-universe.com/index.php?threads/e%C2%B2-plugin-jedi-maker-xtream.309622/
You can find hier the JEDI MAKER XTREAM (find the last plugin version in last page):
https://www.sat-universe.com/index.php?threads/e%C2%B2-plugin-jedi-maker-xtream.309622/page-5
This plugin support EPG, Fav. list and groups. Please fellow last plugin version and tutorial:
You can find also video tutorials in YouTube.
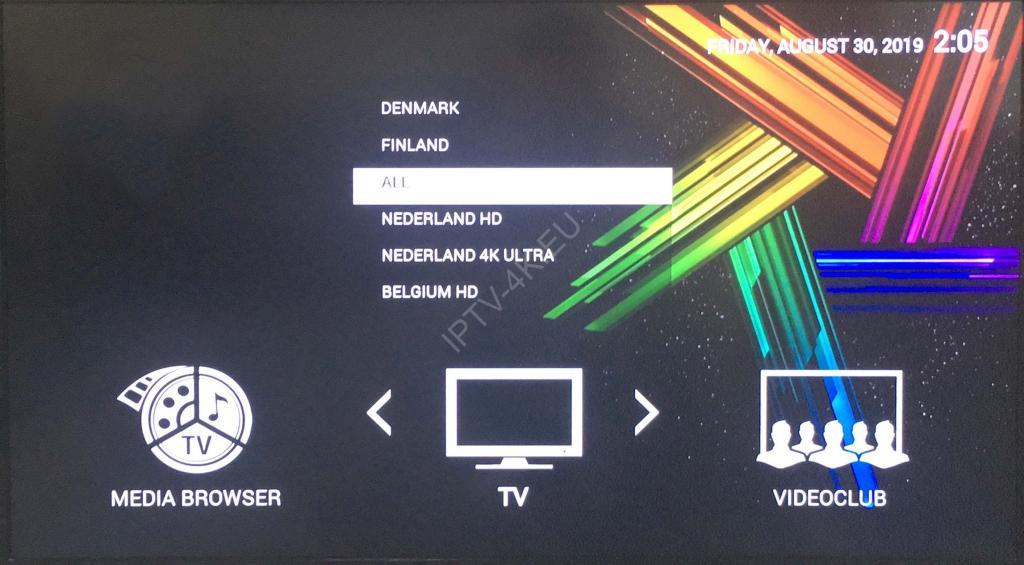
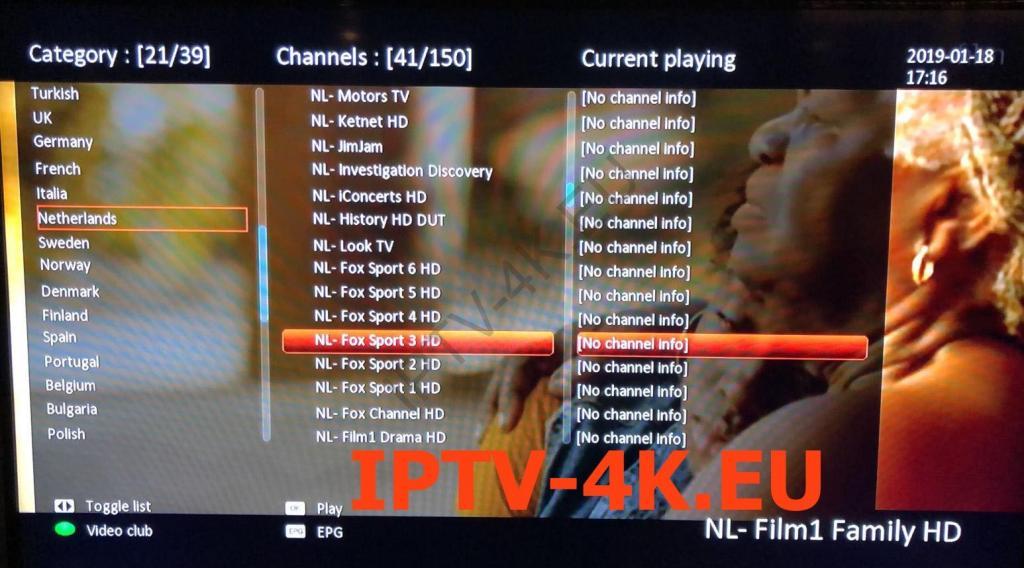
Connect MAG DEVICE to TV and Internet. Then do as follows
1. Go to: Settings—> System Settings —> Servers
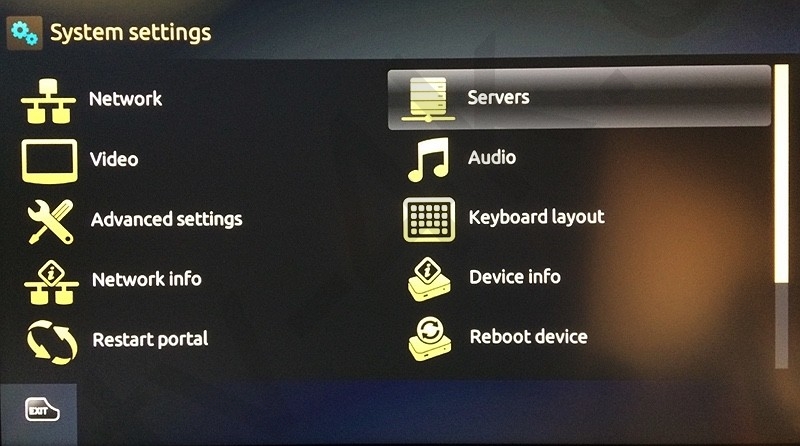
2. Go to: —>Portals
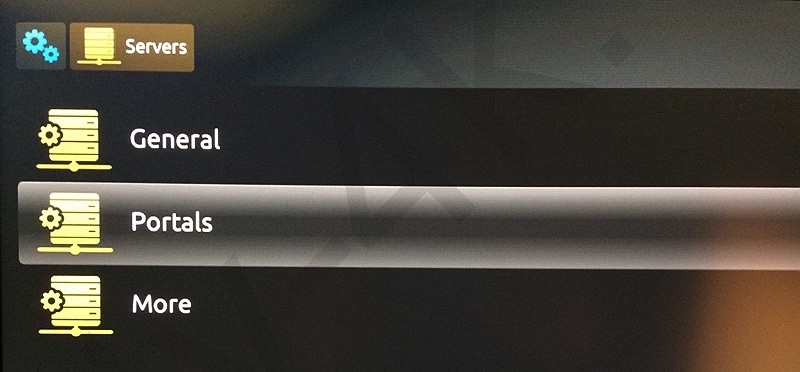
Set Portal 1: IPTV4K
Set Portal 1 URL: (Check your activation e-mail)
Set Portal 2 Name: Adult leave this empty if you don’t order Adult pakket
Set Portal 2 URL: (Check your activation e-mail leave this empty if you don’t order Adult pakket
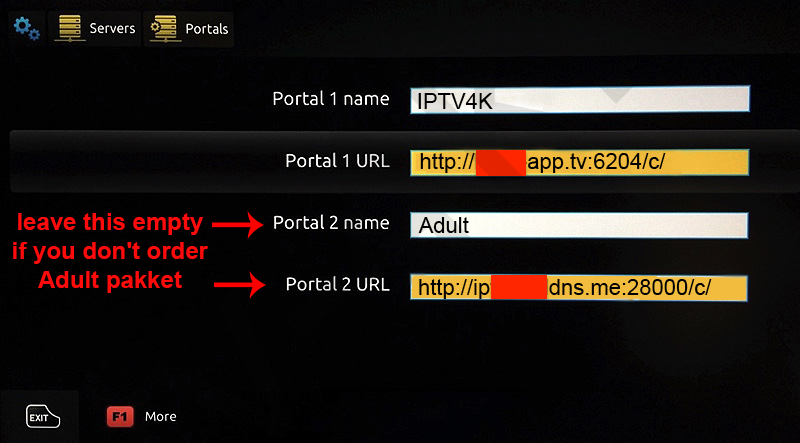
3. Save everything
Reboot device
After the box is restarted, wait until the TV screen shows the channels.
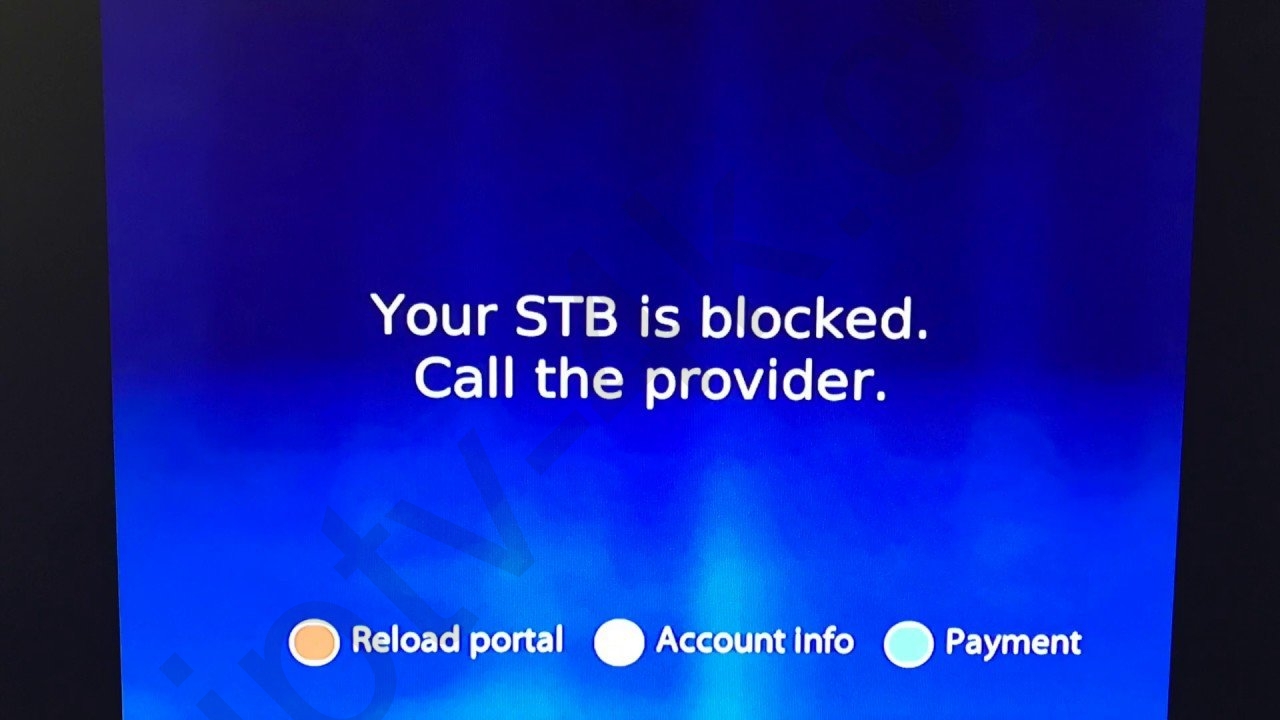
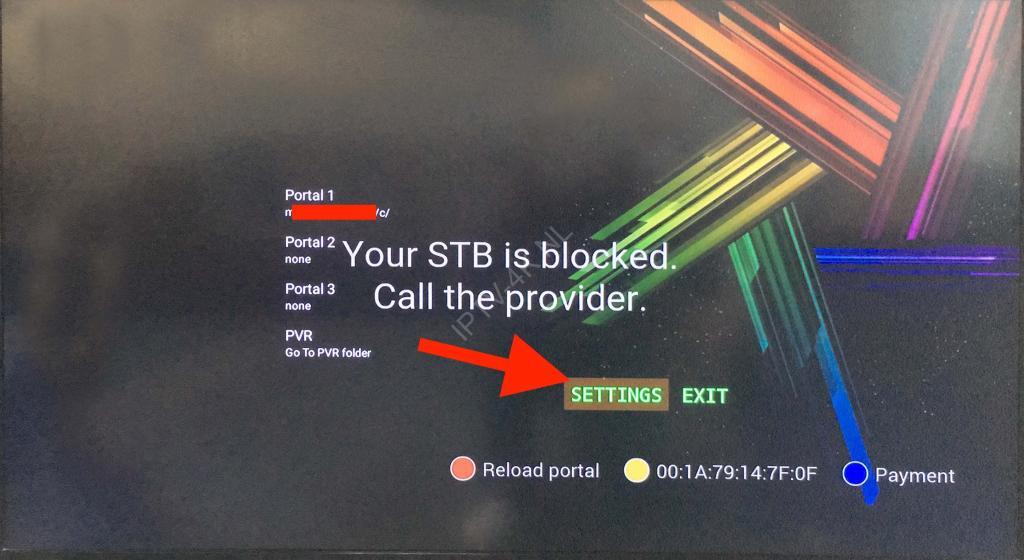
If you get a message on box “Your STB is Blocked. Call the provider” then please contact us.
EXTRA INFORMATIE EN PORTAL URL INVOEREN MAGBox
In uw MAG set top box moet een portal URL (link naar de server) worden ingesteld. Wij adviseren U de MAG box eerst te updaten als dit recentelijk niet is gedaan.
Portal URL invoeren
In uw MAG set top box moet een portal URL (link naar de server) worden ingesteld. Wij adviseren U de MAG box eerst te updaten als dit recentelijk niet is gedaan.
Updaten van uw box:
Het update van uw box is belangrijk voor het goed en stabiel functioneren. Fouten in de software worden er ook mee opgelost. We gaan ervan uit dat Uw box in het TV menu staat:
Kies OK, kies menu (=huisje), kies settings en klik OK. Ga naar Go to the inner portal. Ga naar settings, OK. Ga naar software update en zet deze op Enabled. Ga dan naar settings en kies software update (scroll naar beneden) en klik OK. Kies F1. De box gaat updaten en zal uw box automatisch herstarten. De box ziet nu automatisch elke update en voert deze dan automatisch uit!
Server portal instellen:
In het menu settings gaat u naar servers. In General moet staan (voor de automatische tijd van uw box) pool.ntp.org. Met menu (huisje) eruit en opslaan met OK. Ga in servers naar > portals. U heeft twee invulvelden beschikbaar na de recente update. Kies Portal 1 en zet bij naam IPTV4K. Voer de aan U verstrekte URL in bij Portal 1 Het aan U verstrekte portal URL moet EXACT zo overgenomen worden anders krijgt Uw box geen contact met de server.
Als U naam en portal URL ingevoerd heeft kiest U OK om deze gegevens op te slaan. Ga daarna met menu (huisje) naar reboot device voor het herstarten van de box.
Belangrijk:
In de meeste gevallen kunt U de verkregen portal URL invoeren en is Uw box gelijk geactiveerd. Krijgt u de melding STB (set top box) is blocked dan is het nodig om ons te informeren dat uw box geactiveerd kan worden.
Video Tutorial URL invoeren
MYTVOnline Portal Setup
This tutorial will guide you through the simple setup instruction for Avov Box/Formuler.
IPTV 4K service uses a free media controlled app called ‘TVOnline’.
TVOnline Setup Instructions:
1. From home screen click ‘Market’.
2. Click ‘TvOnline’ app.
3. Install ‘TVOnline’ app.
4. Wait for the installation to finish.
6. Enter ‘Server name’ (for example ‘IPTV4K’)
and enter ‘Portal link’ (Check your activation e-mail).
7. Click ‘Connect’ to start watching.
Troubleshooting Avov Box/Formuler
If you have any audio problems (no audio) in some channels please follow this link:
If you have any problems viewing the Channels please follow this recommended fix:
Restart your App, Avov Box/Formuler, and Wi-Fi Router.
MYTVOnline Playlist Setup - URL M3U
This tutorial will guide you through the simple setup instruction for Avov Box/Formuler.
IPTV 4K service uses a free media controlled app called ‘TVOnline’.
TVOnline Setup Instructions:
1. From home screen click ‘Market’.
2. Click ‘TvOnline’ app.
3. Install ‘TVOnline’ app.
4. Wait for the installation to finish.
6. Enter ‘Server name’ (for example ‘IPTV4K’)
and enter your url m3u link (Check your activation e-mail).
7. Optional: Enter your url EPG link. Go hier and convert your url m3u link to url EPG link: https://iptv-4k.co/epg/
8. Click ‘Connect’ to start watching.
Troubleshooting Avov Box/Formuler
If you have any audio problems (no audio) in some channels please follow this link:
If you have any problems viewing the Channels please follow this recommended fix:
Restart your App, Avov Box/Formuler, and Wi-Fi Router.
This tutorial will guide you through the simple setup instruction for Formuler 8z box (MyOnlineTV 2 app)
IPTV 4K service uses a free media controlled app called ‘MyOnlineTV 2’.
MyOnlineTV 2 app setup instructions:
1. Turn on your box
2. Start MyOnineTV 2 app
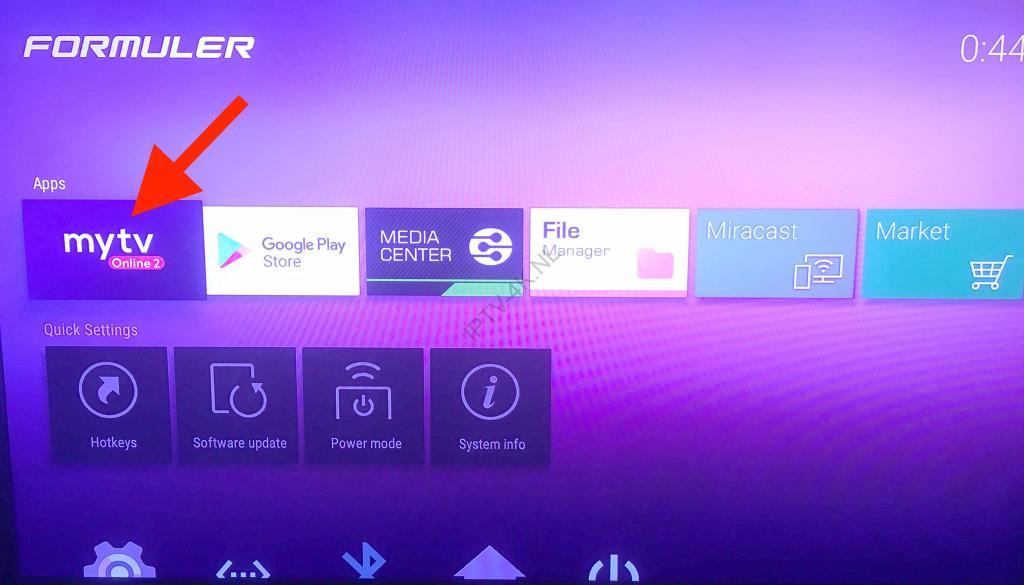
3. Select Add Portal and press OK
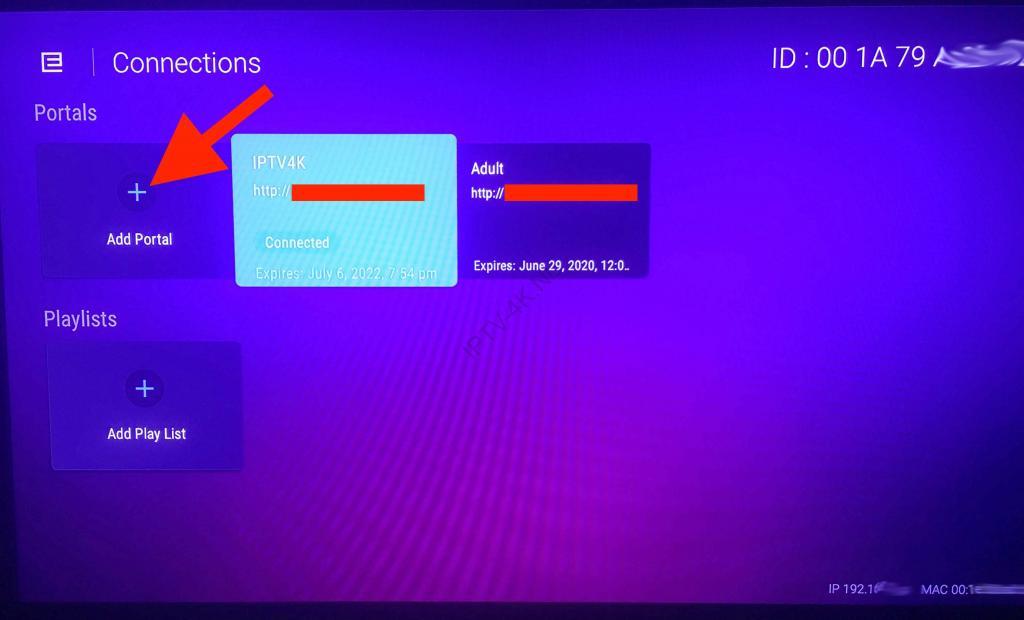
4. Enter ‘Portal Nickname’ (for example ‘IPTV4K’) and enter ‘Portal URL link’ (Check your activation e-mail).
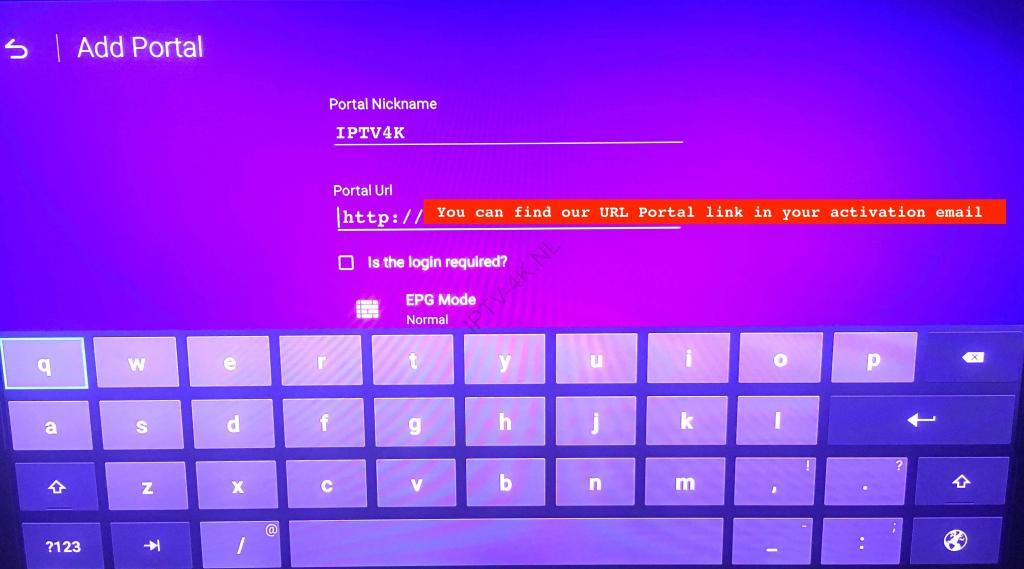
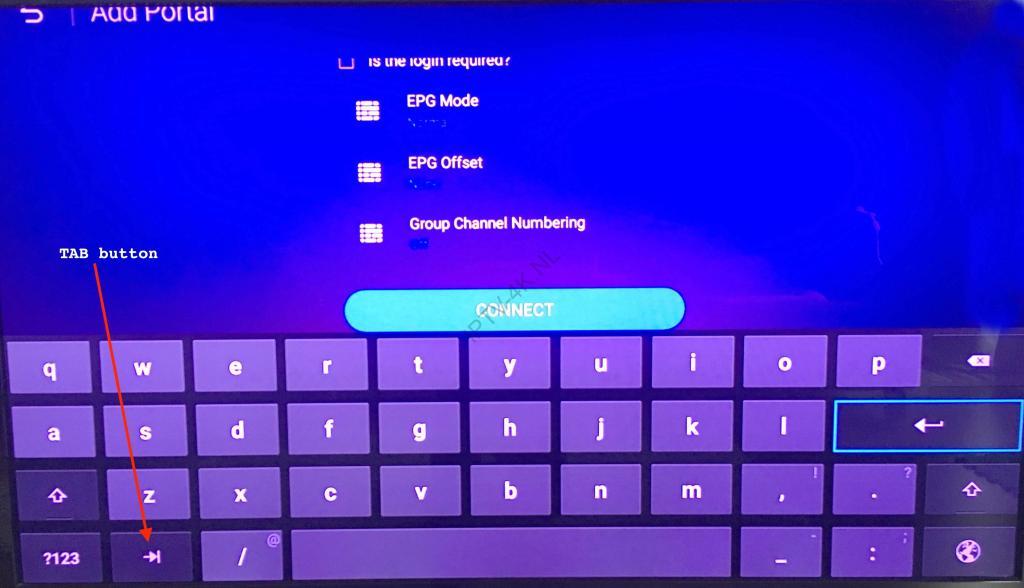
5. Go down by using TAB button on your remonte controle or in the screen keyboard (see photo) then select connect and press OK
7. Start watching.
Troubleshooting Formuler
If you have any problems viewing the Channels please follow this recommended fix:
Restart your Formuler box, and Router (modem).
Click here for more official Formuler tutorials
This tutorial will guide you through the simple setup instruction for Formuler 8z box (MyOnlineTV 2 app)
IPTV 4K service uses a free media controlled app called ‘MyOnlineTV 2’.
MyOnlineTV 2 app setup instructions (URL m3u method)
1. Turn on your box
2. Start MyOnineTV 2 app
3. Select Add Play List and press OK
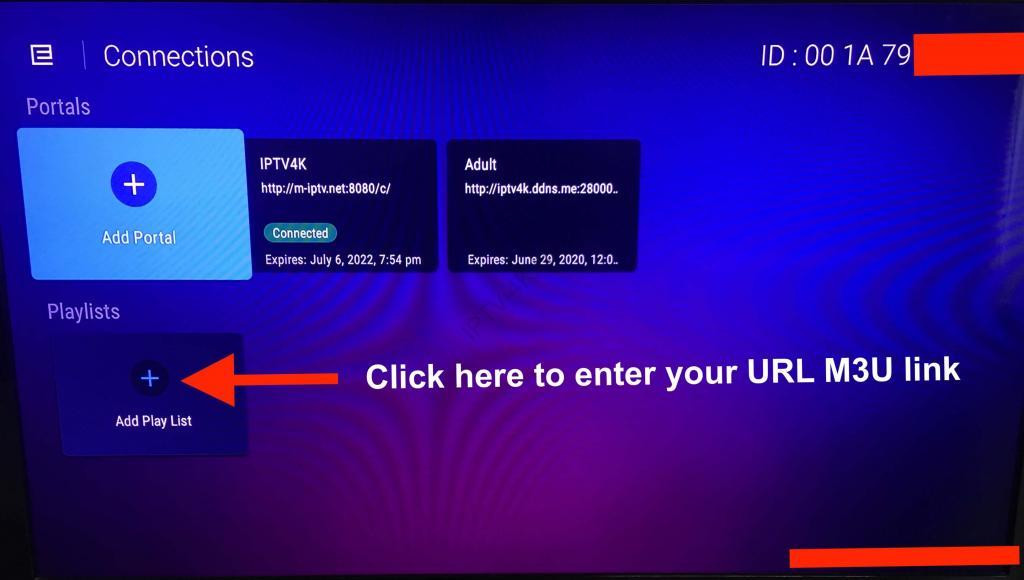
4. Enter ‘Play List Nickname’ (for example ‘IPTV’) and enter ‘URL m3u link’ (Check your activation e-mail).
5. Optional: Convert your URL m3u link to URL EPG XML link here: https://iptv-4k.co/epg/ and add it in Playlist XML TV EPG URL field.
6. Go down by using TAB button on your remonte controle or in the screen keyboard (see photo) then select connect and press OK
8. Start watching.
Troubleshooting Formuler
If you have any problems viewing the Channels please follow this recommended fix:
Restart your Formuler box and Router (modem).
This tutorial will guide you through the simple setup instruction for Formuler Z11 box (MyOnlineTV 3 app)
IPTV 4K service uses a free media controlled app called ‘MyOnlineTV 3’.
MyOnlineTV 3 app setup instructions (URL Portal Mac ID Method)
1. Turn on your box and start MyOnineTV 3 app.
2. Fellow here the orginal Formuler video tutorial (Methode 1 Mac ID): Click here to download the tutorial then start it
Please don’t use the url portal in the video tutorial and use only the url portal that we send it to your email (activation email).
Troubleshooting Formuler
If you have any problems viewing the Channels please follow this recommended fix:
Restart your Formuler box and Router (modem).
This tutorial will guide you through the simple setup instruction for Formuler Z11 box (MyOnlineTV 3 app)
IPTV 4K service uses a free media controlled app called ‘MyOnlineTV 3’.
MyOnlineTV 3 app setup instructions (URL m3u method)
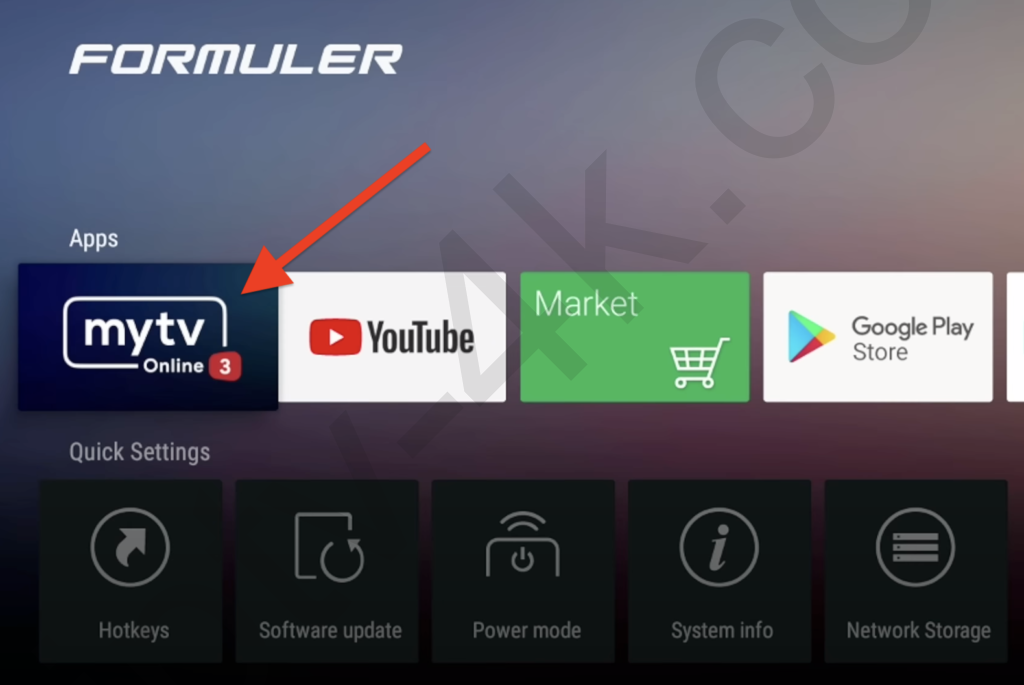
1. Turn on your box and start MyOnineTV 3 app.
2. Select Content Manager
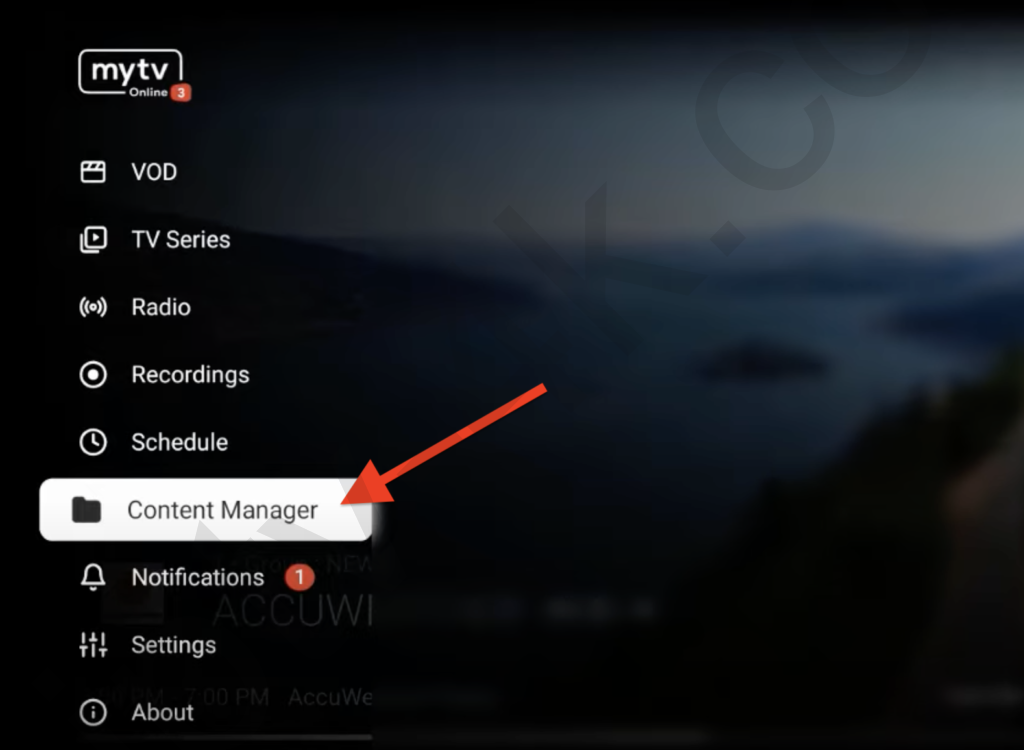
3. Select Content Sources

4. Select Add Play List and press OK
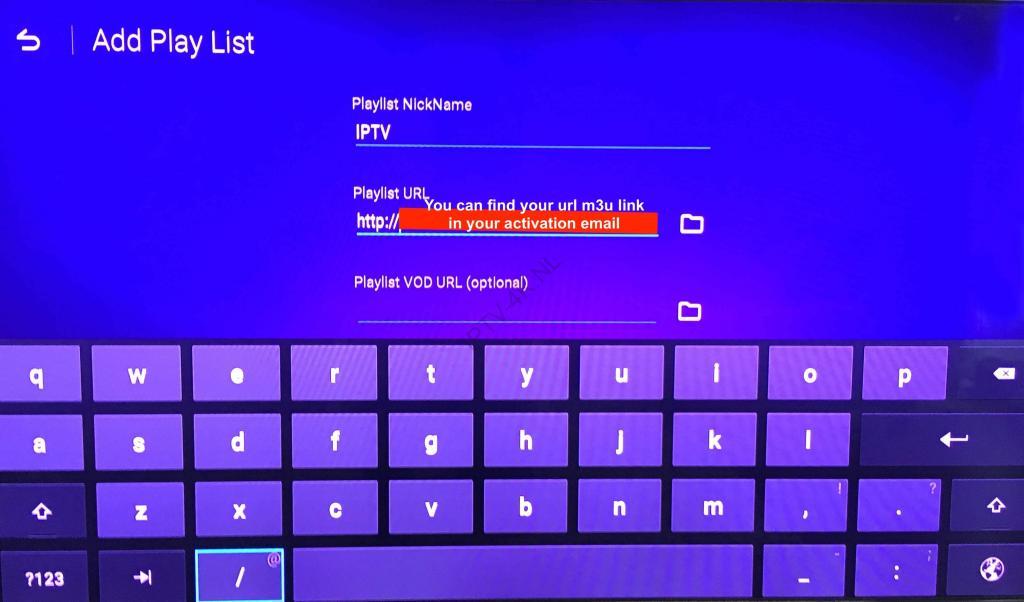
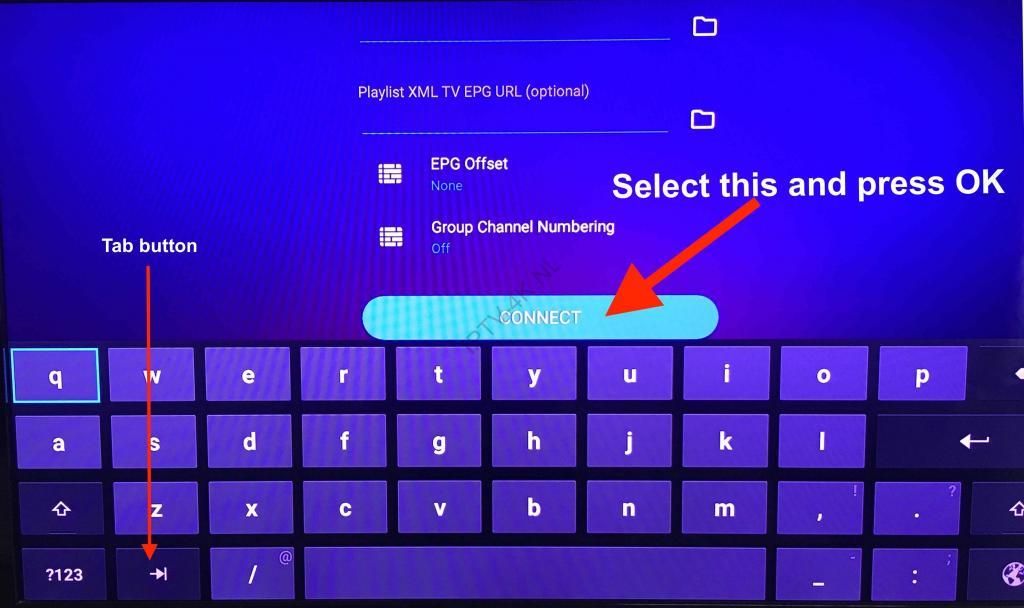
5. Enter ‘Play List Nickname’ (for example ‘IPTV-4K’) and enter your ‘URL m3u link’ (Check your activation e-mail).
 5.
5.
Optional: Enter XMLTV EPG URL (Check your activation e-mail or convert your URL m3u link to URL EPG XML link here: https://iptv-4k.co/epg/ and add it in Playlist XML TV EPG URL field.
6. Select connect and press OK
7. Select: Yes, use portal
 8. Start watching.
Troubleshooting Formuler
If you have any problems viewing the Channels please follow this recommended fix:
Restart your Formuler box and Router (modem).
De Amiko en QSmarter boxen werken perfect met onze IPTV 4K. Volge onderste stappen:
1. Geef je MAC ID door bij het bestellen van je IPTV abonnement. Deze begint met 00:1A:79.
Nadat wij deze hebben geactiveerd, kun je verbinden met de portal om te starten met IPTV.
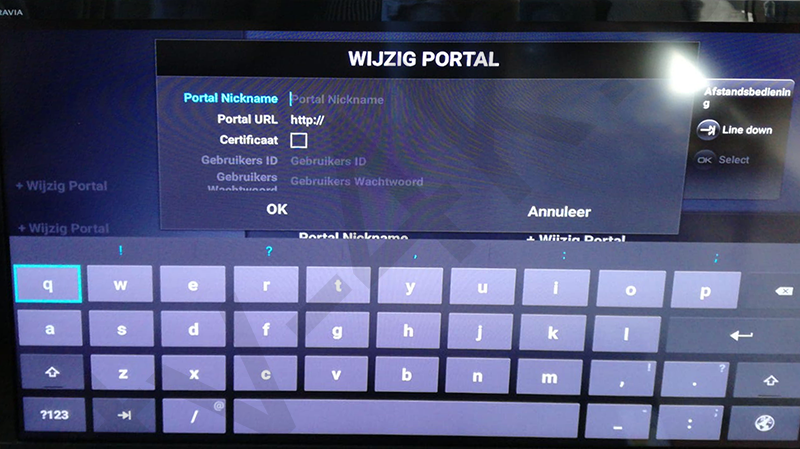
2. Open de MYTV app
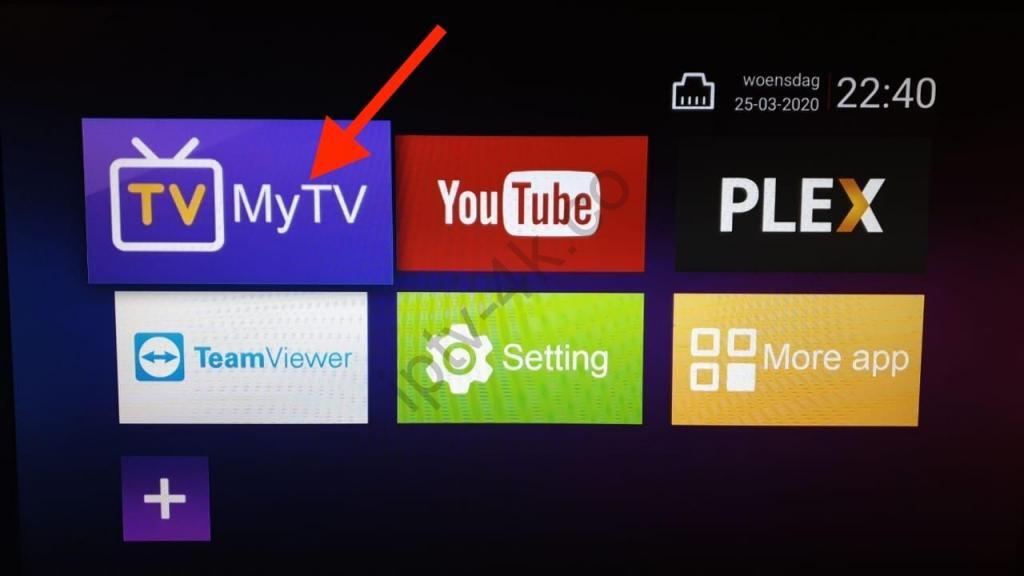
3. Druk Menu > Portal Instelingen
4. Select een portal (meestal Portal1) dan druk Wijzig Portal
5. Vul in Portal naam = IPTV4K (of Portal1 laten staan, heeft geen effect)
6. Invoer onze Portal URL (Zie uw activatie email)
7. User/wachtwoord = LEEG LATEN
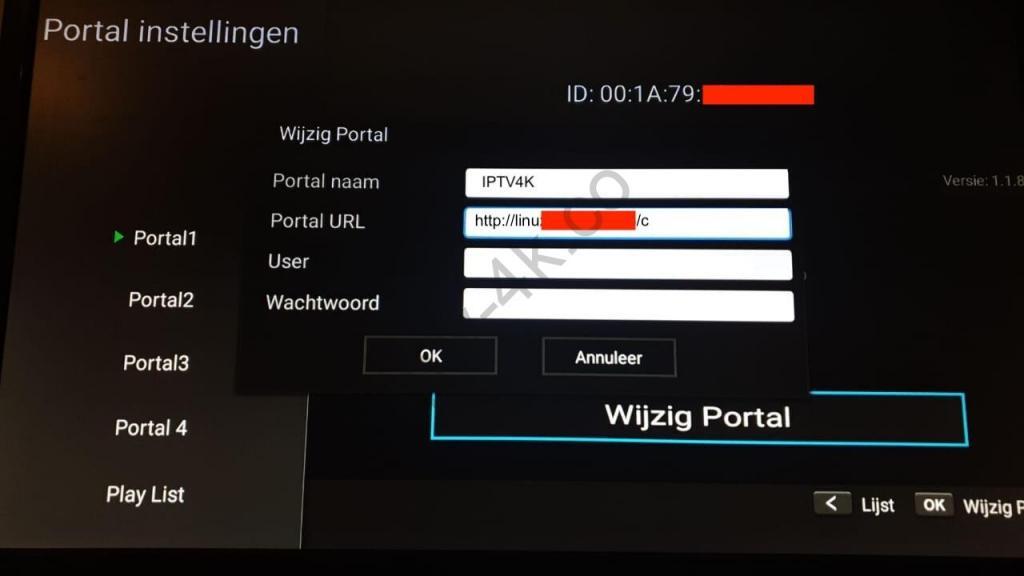
8. Sla op door OK te drukken
9. Verbind met portal door het portal te selecteren en OK te drukken in de linkerbalk.
Enjoy!
De BuzzTV boxen werken perfect met onze IPTV 4K. Volge onderste stappen:
In deze guide leert u hoe je een portal kunt toevoegen op BuzzTV XR4000 /XRS4000
U MAC adres dient geactiveerd te zijn alvorens u verbindt met het portal.
- Ga naar Connections
- Ga naar Server Settings en voeg een nieuwe server toe
- Name: naam aanbieder
- Portal URL: (zie uw activatie email)
- Connect en enjoy!
This tutorial will guide you through the simple setup instruction for Maxytec RAPTOR Box.
Find the MAC address in the device and setup instructions:
1. Let the STB Boot Up.
2. Goto “My Apps”, The ‘MAC address’ is in the upper right corner.
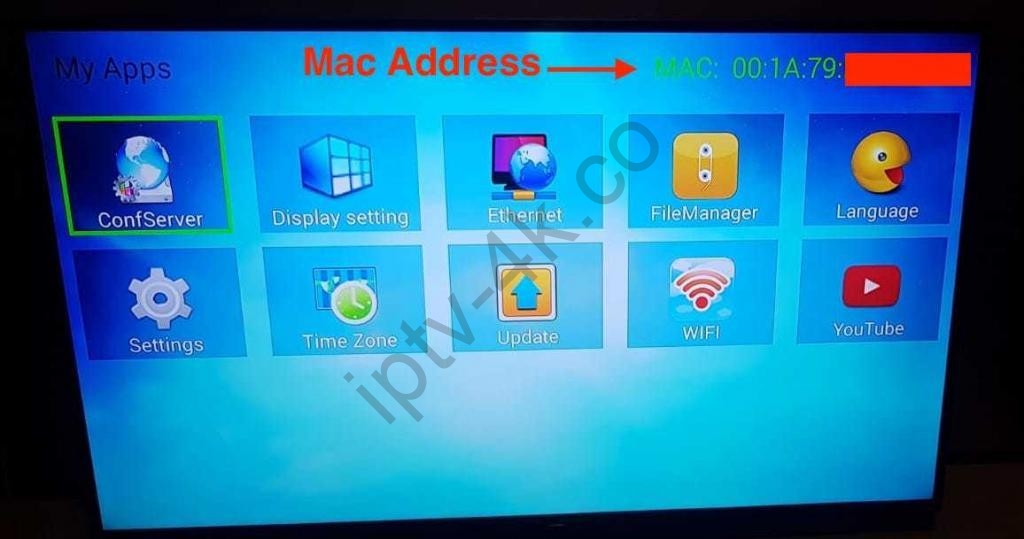
3. Select ‘ConfiServer’.
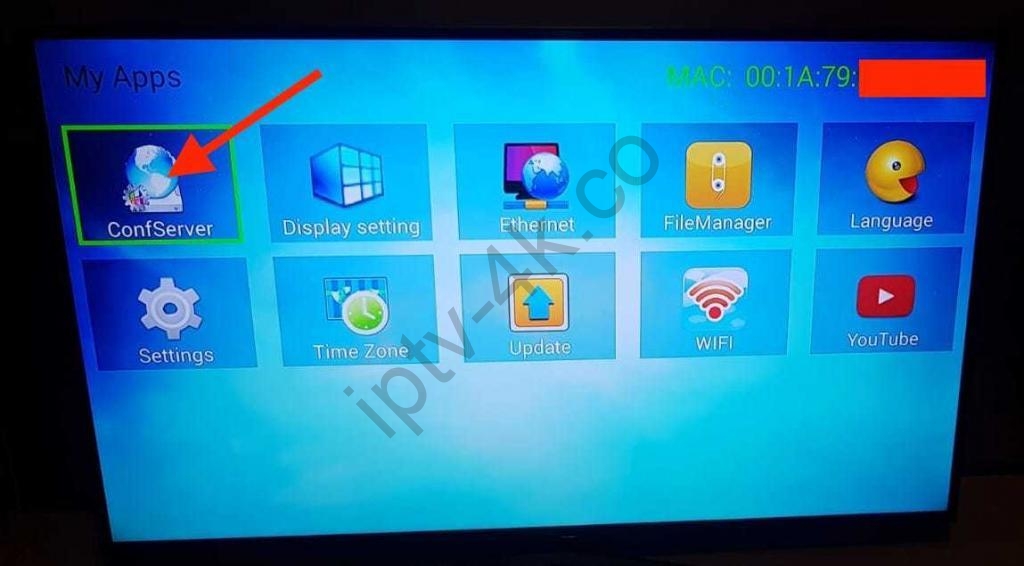
4. Enter your ‘Portal URL’ (Check your activation e-mail)

5. Click on Exit And Save.
6. Restart your ‘Maxytec Box’ and start watching.
Troubleshooting Maxytec RAPTOR Box
If you have any problems viewing the Channels please follow this recommended fix:
Restart your Maxytec Box and Wi-Fi Router.
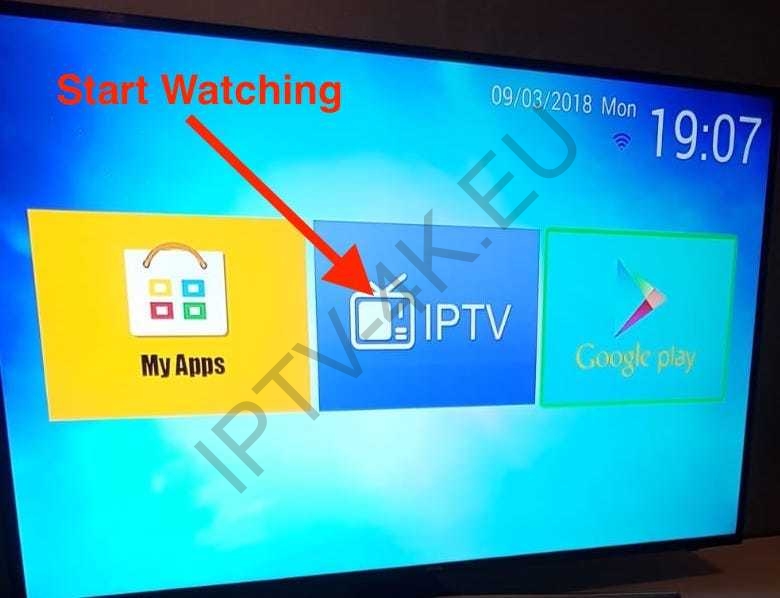
This tutorial will guide you through the simple setup instruction for Maxytec INFINITY 4K Box.
Find the MAC address in the device and setup instructions:
1. Let the STB Boot Up.
2. Press Menu then 00 00 00 00 from the remonte controle.
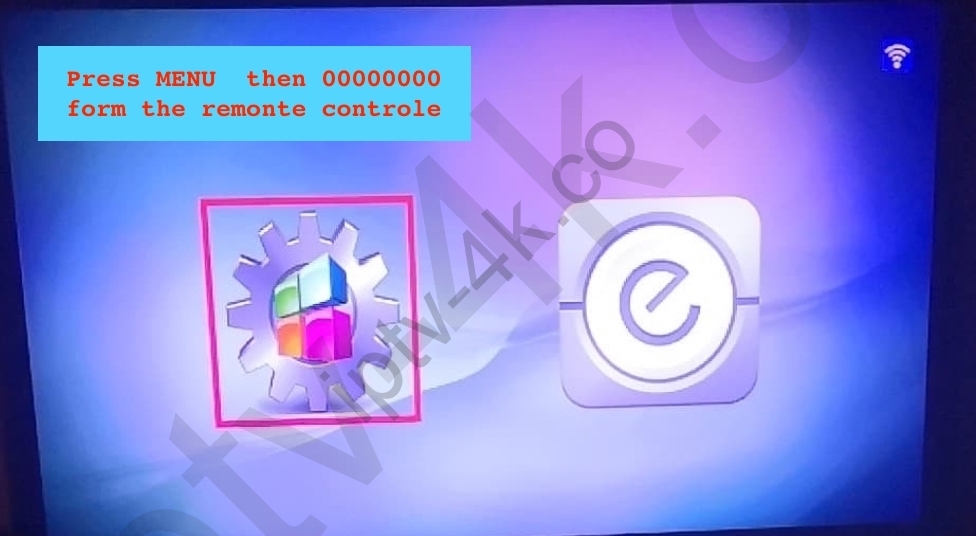
3. You will get this menu. Select MY TV

5. Press again MENU from remonte controle.
6. Select URL 1 en press OK from the remote control.
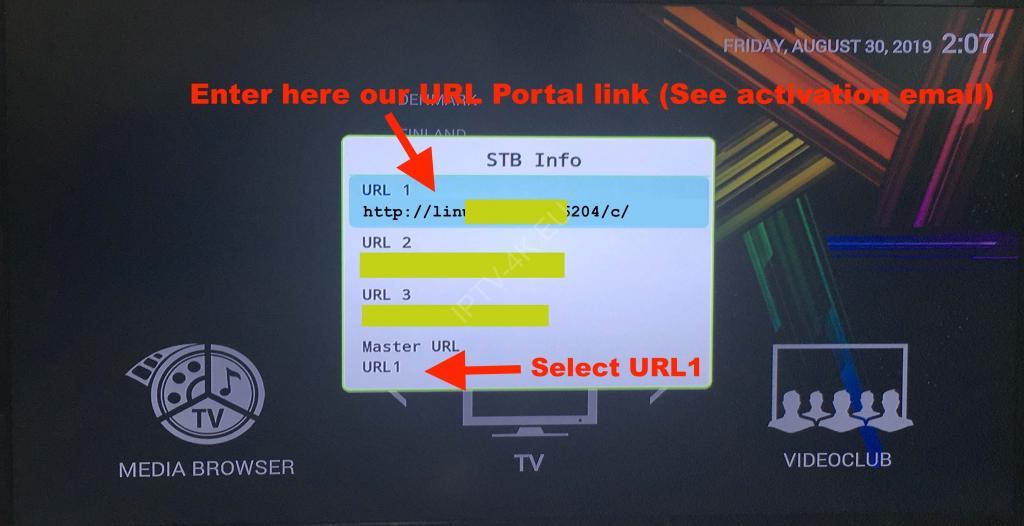
7. Enter our url portal link (See the activation email) then press OK.
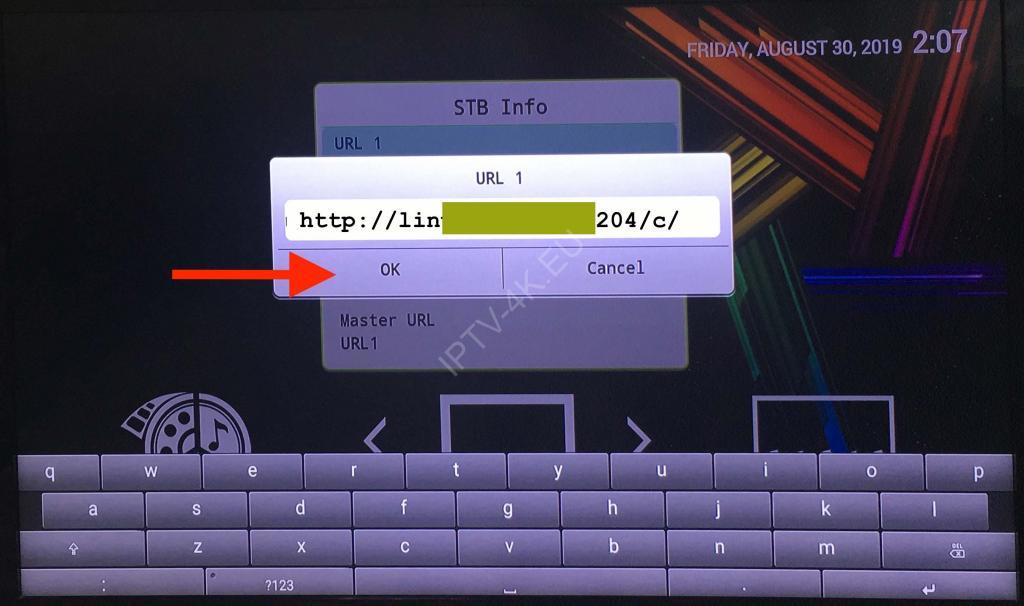
8. Select channel and start watching.
Troubleshooting Maxytec Box
If you have any problems viewing the Channels please follow this recommended fix:
Restart your Maxytec Box and Wi-Fi Router.
This tutorial will guide you through the simple setup instruction for Maxytec PHOENIX 4K Box.
Find the MAC address in the device and setup instructions:
1. Let the STB Boot Up.
2. Press Menu then 00 00 00 00 from the remonte controle.
3. You will get this menu. Select LIVE TV

5. Press again MENU from remonte controle and select SETTINGS
6. Select Path to portal en press OK from the remote control.
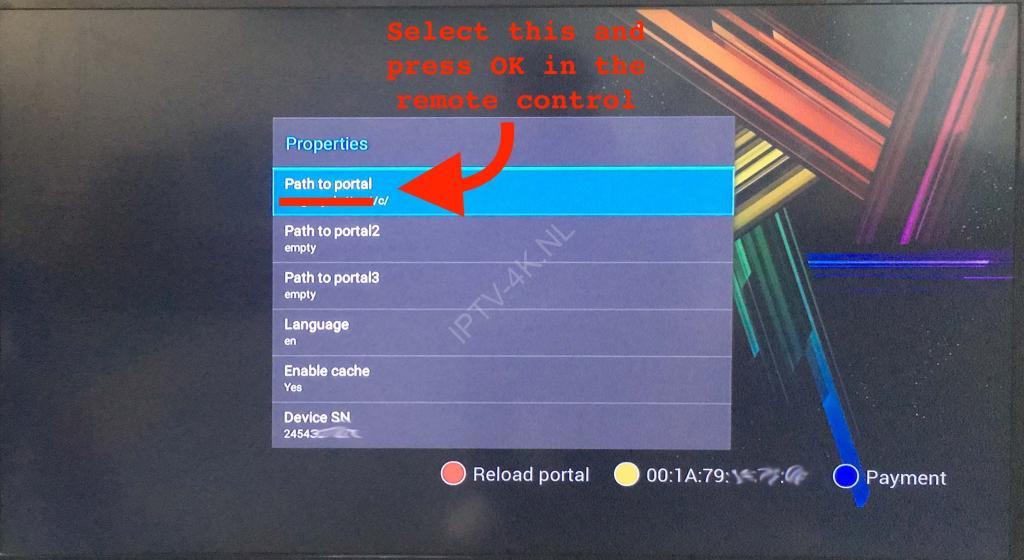
7. Enter our url portal link (See the activation email) then press OK.
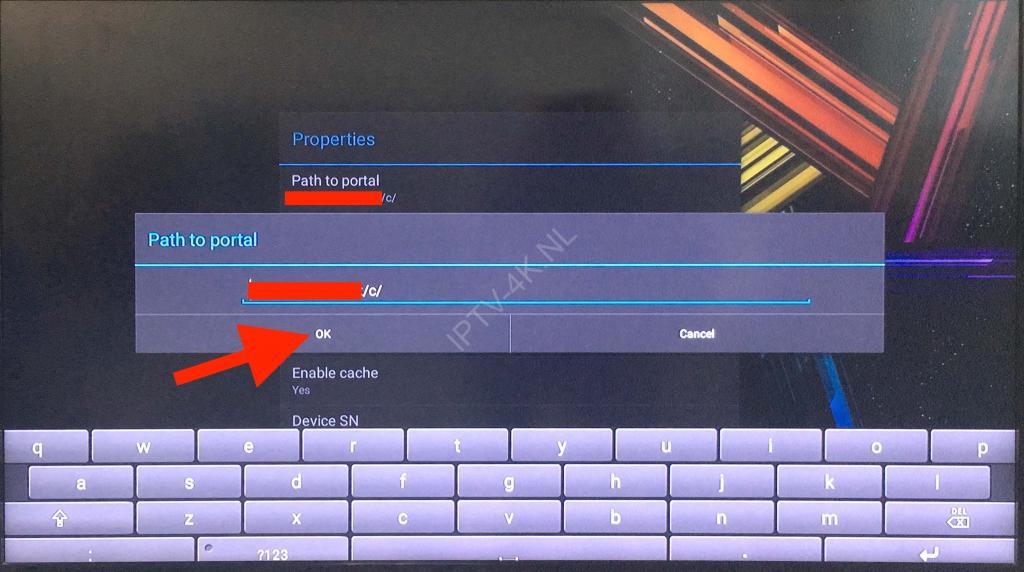
8. Select channel and start watching.
Troubleshooting PHOENIX 4K Box
If you have any problems viewing the Channels please follow this recommended fix:
Restart your Maxytec Box and Wi-Fi Router.
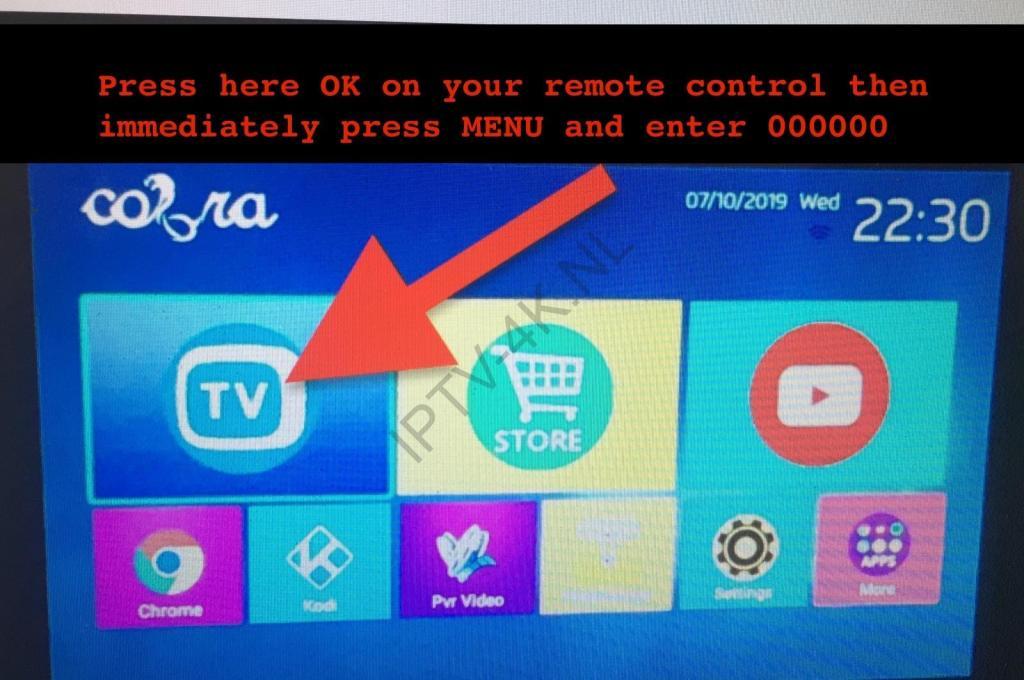
This tutorial will guide you through the simple setup instruction for Cobra V5 Box.
Find the MAC address in the device and setup instructions:
1. Let the STB Boot Up.
2. Press Menu then 00 00 00 00 from the remonte controle.
3. Press here OK on your remote control then immediately press MENU and enter 000000
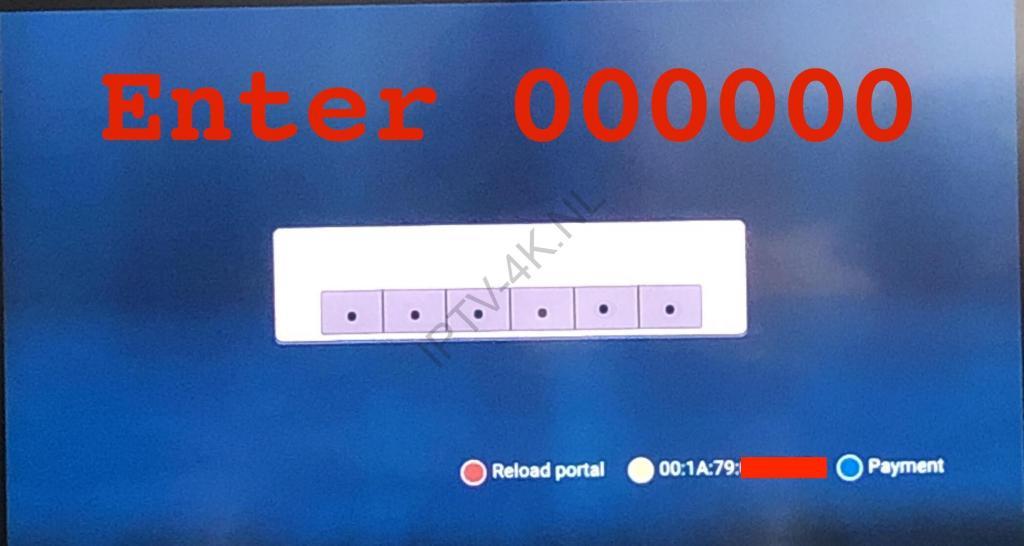
5. Press again MENU from remonte controle and select SETTINGS
6. Select Path to portal en press OK from the remote control.
7. Enter our url portal link (See the activation email) then press OK.
8. Select channel and start watching.
Troubleshooting Cobra V5 Box
If you have any problems viewing the Channels please follow this recommended fix:
Restart your Cobra Box and Wi-Fi Router.
This tutorial will guide you through the simple setup instruction for Xsarius Sniper Box.
Find the MAC address in the device and setup instructions:
1. Let the STB Boot Up.
2. Goto “Menu” and select Potrtals. See photo:
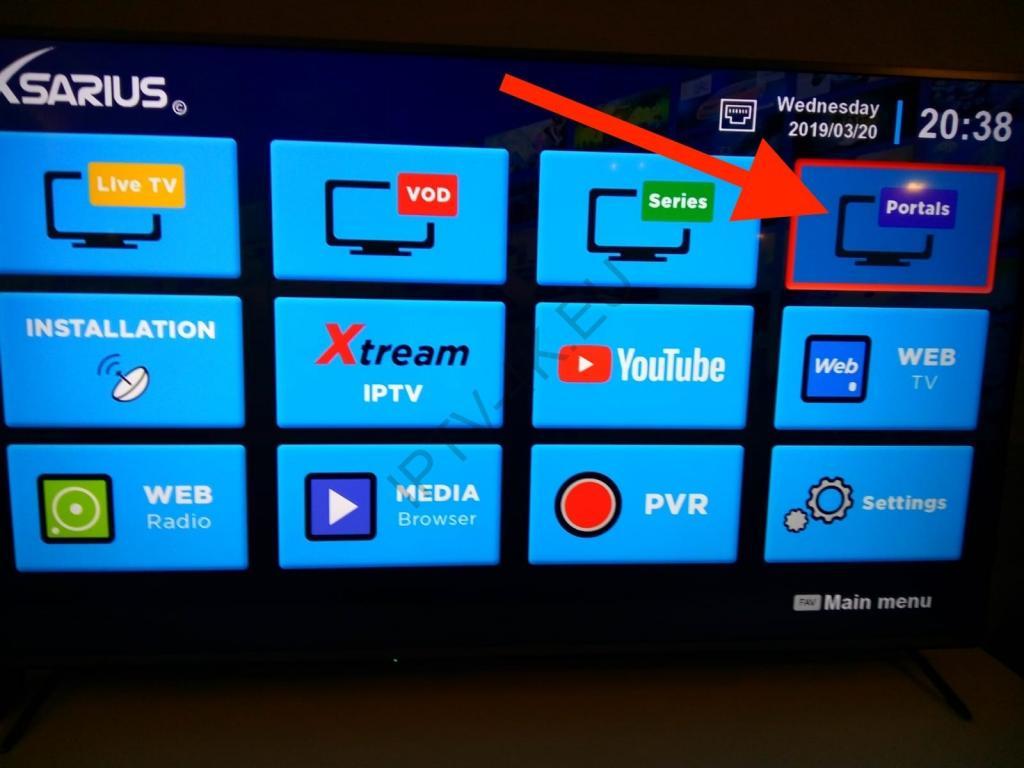
3. You can find the ‘MAC address’. See the photo:

4. First select the portal then press on green button in the remont control of the box Enter.Enter PinCode:6969

6. Enter your ‘Portal URL’ (Check your activation e-mail).
 5. Click on Exit And Save.
6. Restart your ‘Xsarius Sniper Box’ and start watching.
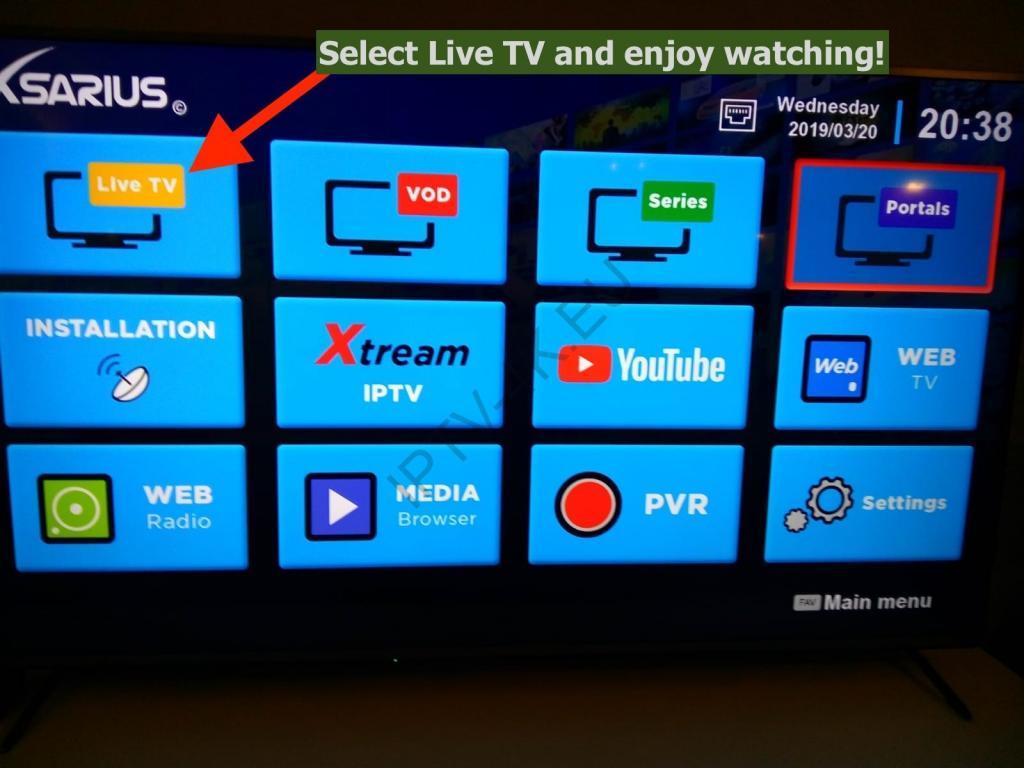
Troubleshooting Xsarius Sniper Box
If you have any problems viewing the Channels please follow this recommended fix:
Restart your Xsarius Sniper HD Box and Router.
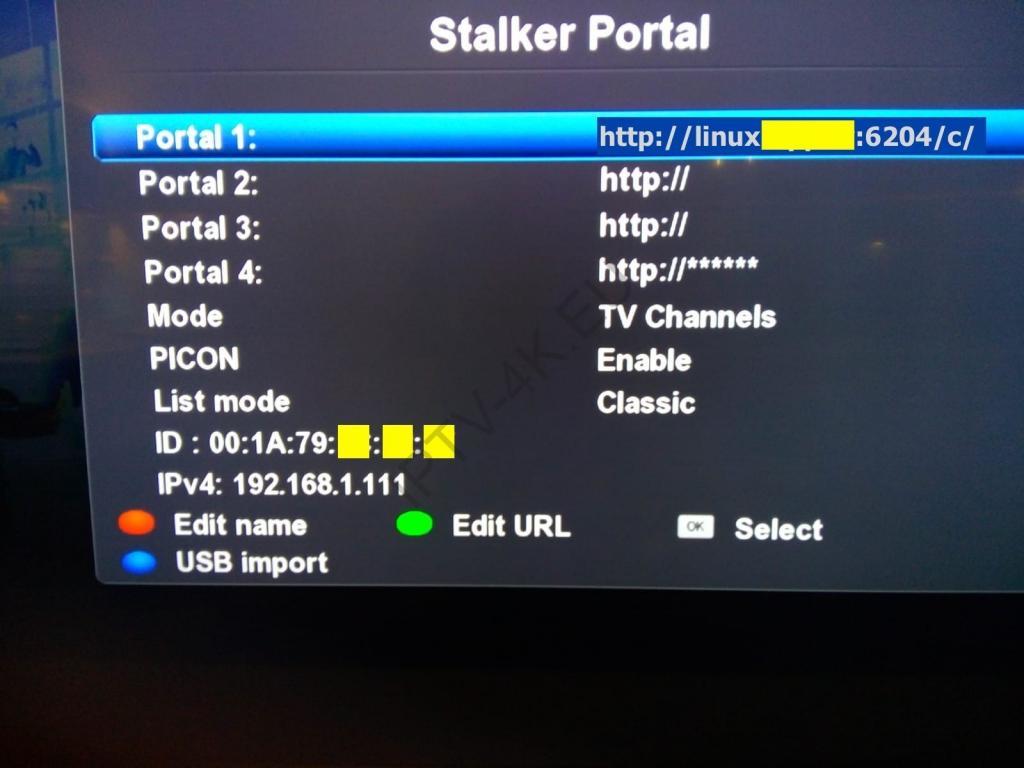
This tutorial will guide you through the simple setup instruction for Xsarius Sniper Box.
U kan het MAC adres vinden in uw IPTV applicatie of op uw apparaat:
Start u Xsarius STB op en open de IPTV app: Premium TV
Ga naar “Menu” en selecteer Portals
Onderin kun u uw Mac adres vinden – deze geef u door aan ons.
Selecteer vervolgens een portal en druk dan op het groene knopje op uw afstandsbediening.
Vul u verkregen “Portal URL” (zie uw activatie email) in. > Exit and Save.
Herstart je Xsarius Box en begin met kijken!
Troubleshooting Xsarius Sniper Box
If you have any problems viewing the Channels please follow this recommended fix:
Restart your Xsarius Sniper Box and Router.
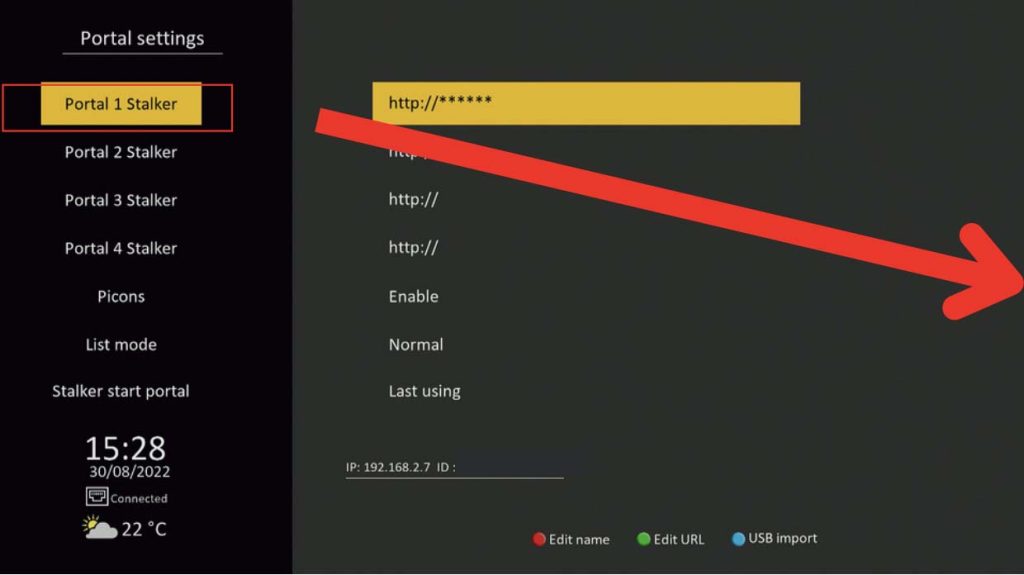
This tutorial will guide you through the simple setup instruction for BLOMC, Maxytec i100, Cobra IPTV SMARTBOX Box.
Box Setup Instructions:
- Go to settings.
- IP Settings
- Stalker portal settings
- Press the [ RED ] button then 1212 in the remote control very fast
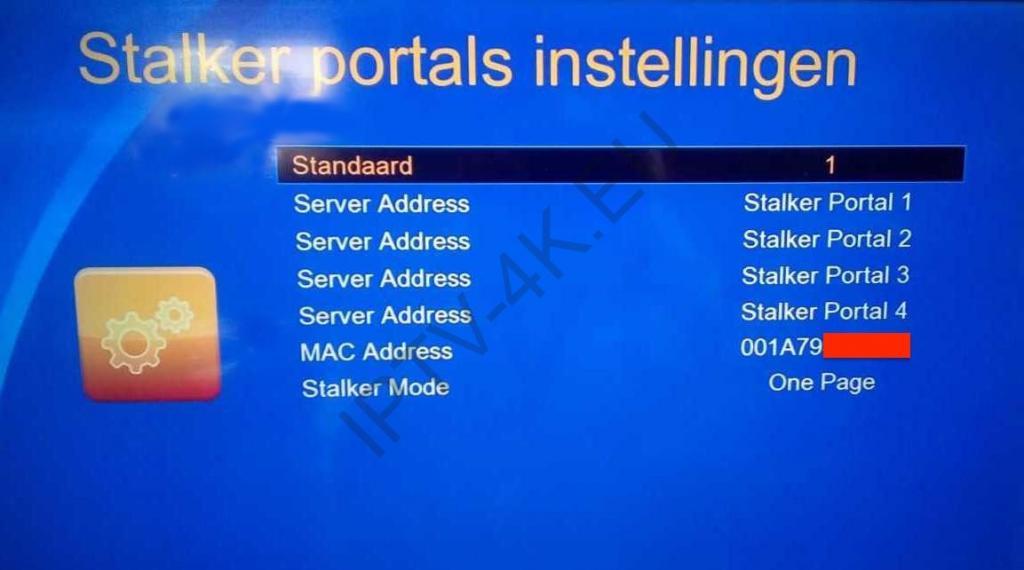
- Enter your portal URL (Check your activation e-mail)
- Press [FAV] To save
- Exit, and the portal has been saved
- Restart your box and start watching.
Troubleshooting
If you have any problems viewing the Channels please follow this recommended fix:
Restart your BOX and Wi-Fi Router.
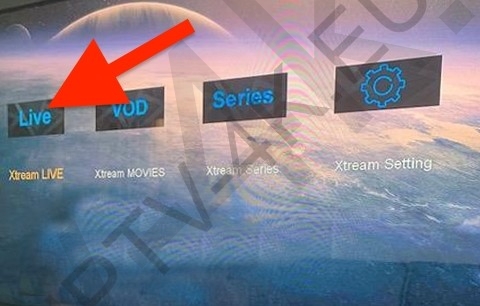
This box Support Xtream and Stalker method but with new Firmware Stalker method working not good (LIVE TV give black screen) so please use Xtream method (URL M3U LINK).
This tutorial will guide you through the simple setup instruction for iBravebox M258 Box with Xtream method.
iBravebox M258 Setup Instructions:
- Update your box to the last firmware.
- Go to IPTV.
- Select XTREAM
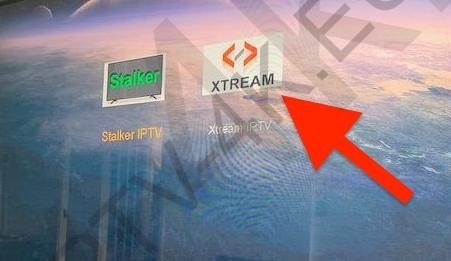
- Select XTREAM Setting
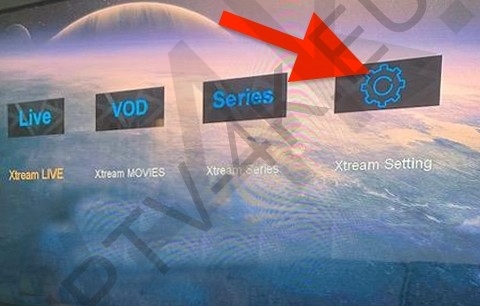
- Full the server information (Check your activation email)
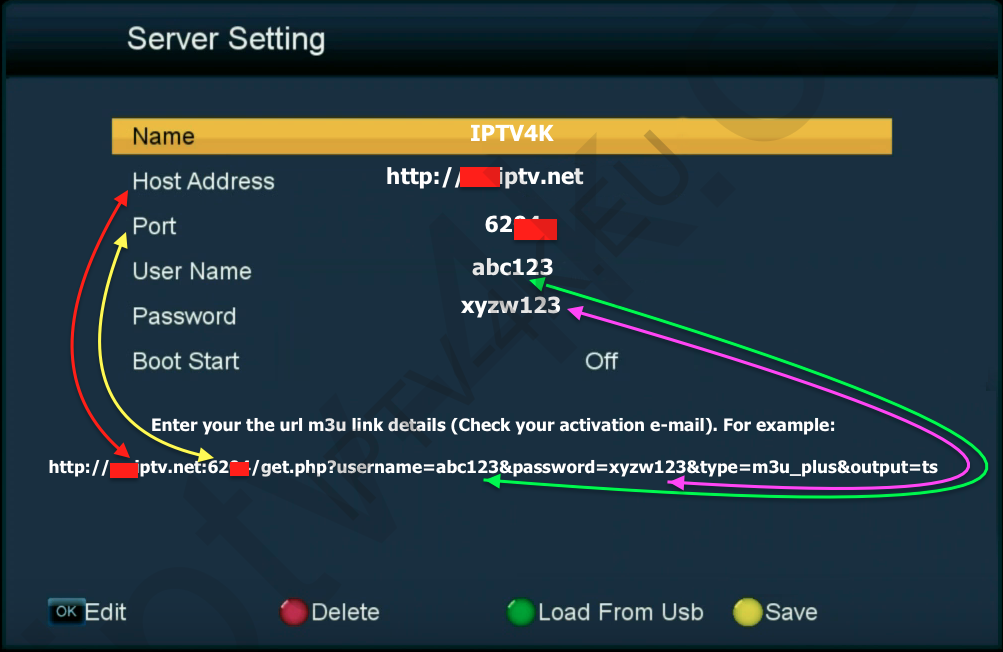
- After setting the server information, press on the remote control “yellow” key to save.

- Go to XTREAM LIVE and start watching.
Troubleshooting iBravebox M258 Box
If you have any problems viewing the Channels please follow this recommended fix:
Restart your iBravebox M258 BOX and Wi-Fi Router.
This box Support Xtream and Stalker method but with new Firmware Stalker method working not good (LIVE TV give black screen) so please use Xtream method (URL M3U LINK).
The tutorial Xtream method coming soon.
This tutorial will guide you through the simple setup instruction for iBravebox M258 Box with Stalker method.
iBravebox M258 Setup Instructions:
- Go to settings.
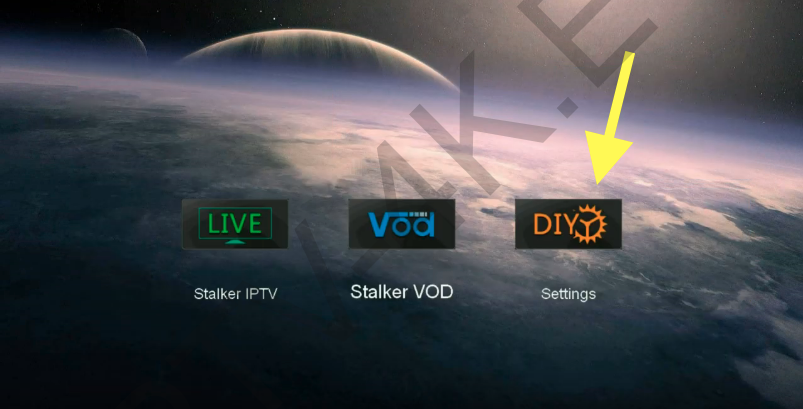
- Enter your portal Name: IPTV4K
- Enter your portal URL (Check your activation e-mail)
- Exit, and the portal has been saved
- Restart your ‘iBravebox M258’ box’.
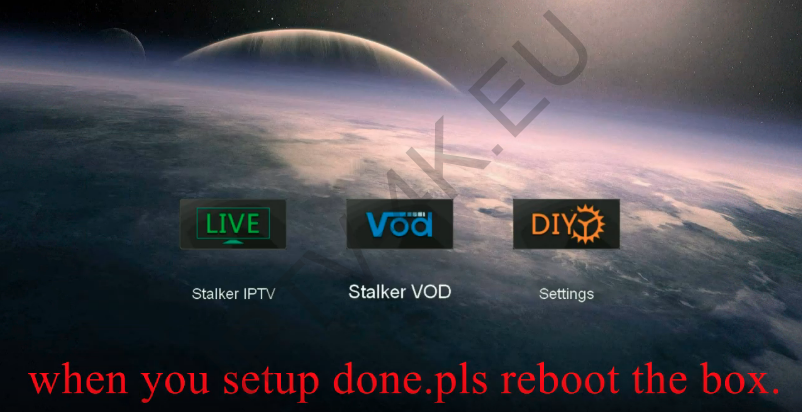
- Go to Stalker IPTV and start watching.
Troubleshooting iBravebox M258 Box
If you have any problems viewing the Channels please follow this recommended fix:
Restart your iBravebox M258 BOX and Wi-Fi Router.
This box Support Xtream and Stalker method but with new Firmware Stalker method working not good (LIVE TV give black screen) so please use Xtream method (URL M3U LINK).
This tutorial will guide you through the simple setup instruction for GTMEDIA I-FIRE Box.
GTMEDIA I-FIRE Setup Instructions:
- Go to Account.
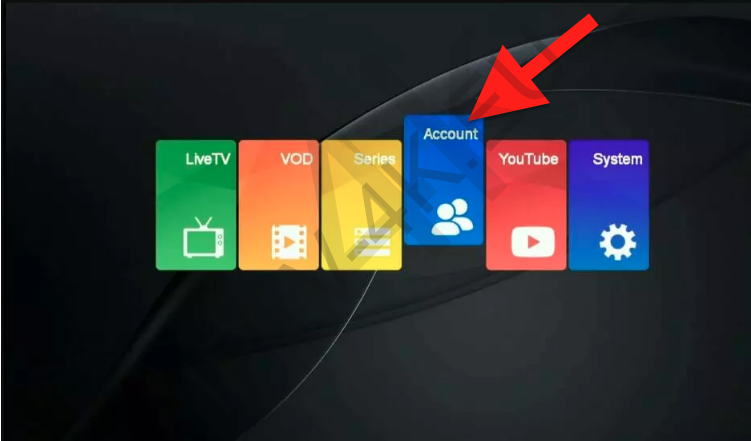
- Press GREEN button in the remonte control.
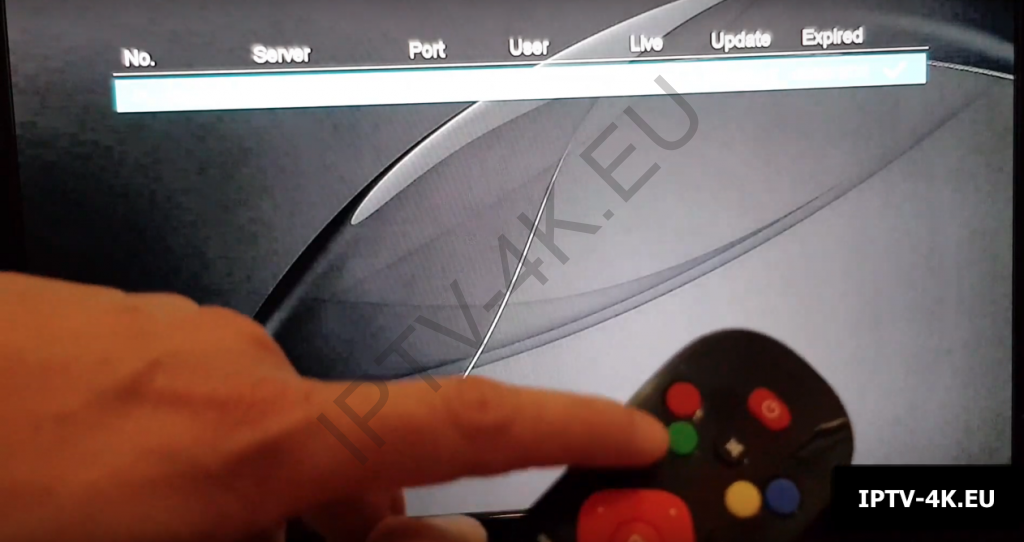
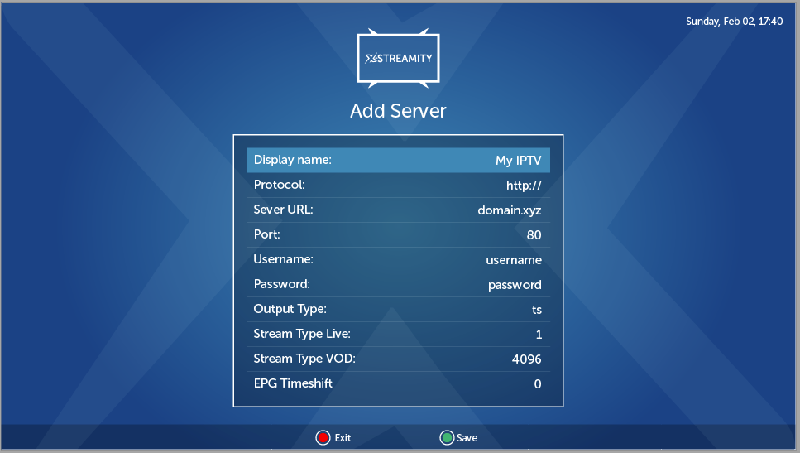
- Enter your URL, Port, User and Password (Check your activation e-mail) and see also the example in the photo.
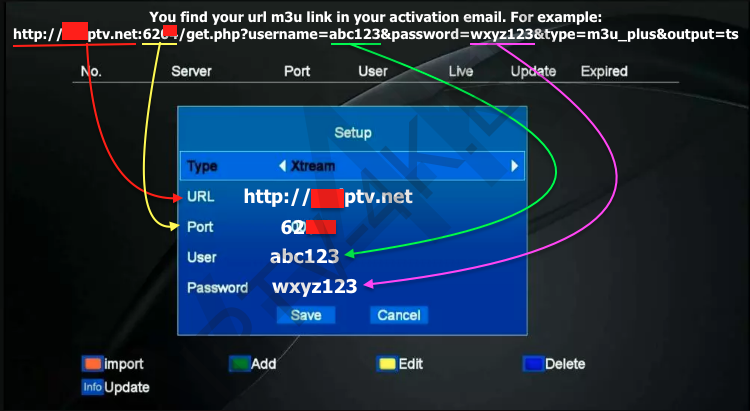
- Goto Save and press OK in the remonte control.
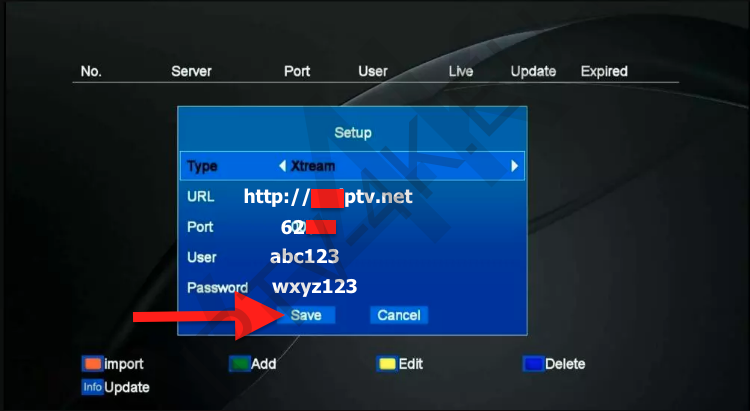
- Press info in the remonte control.
- Go to LiveTV and start watching.

Troubleshooting GTMEDIA I-FIRE
If you have any problems viewing the Channels please follow this recommended fix:
Restart your GTMEDIA I-FIRE BOX and Router. Connect always your box with cable and direct to main modem.
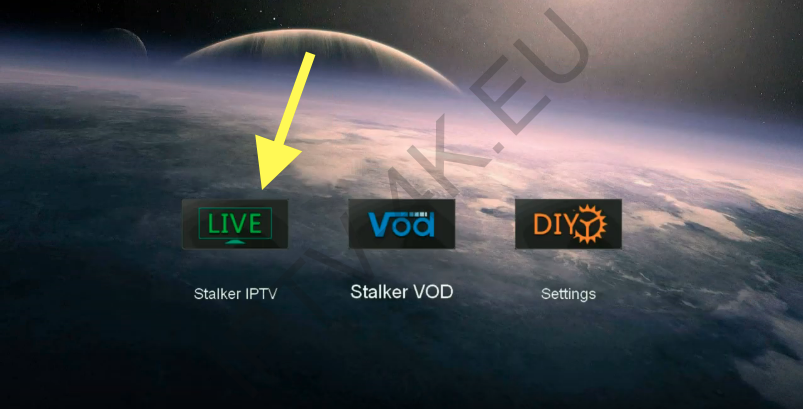
This box works in the same way as the Mag box (Stalker Portal).
This tutorial will guide you through the simple setup instruction for Octagon Box.
Setup Instructions:
- Go to Network then go to Stalker TV.
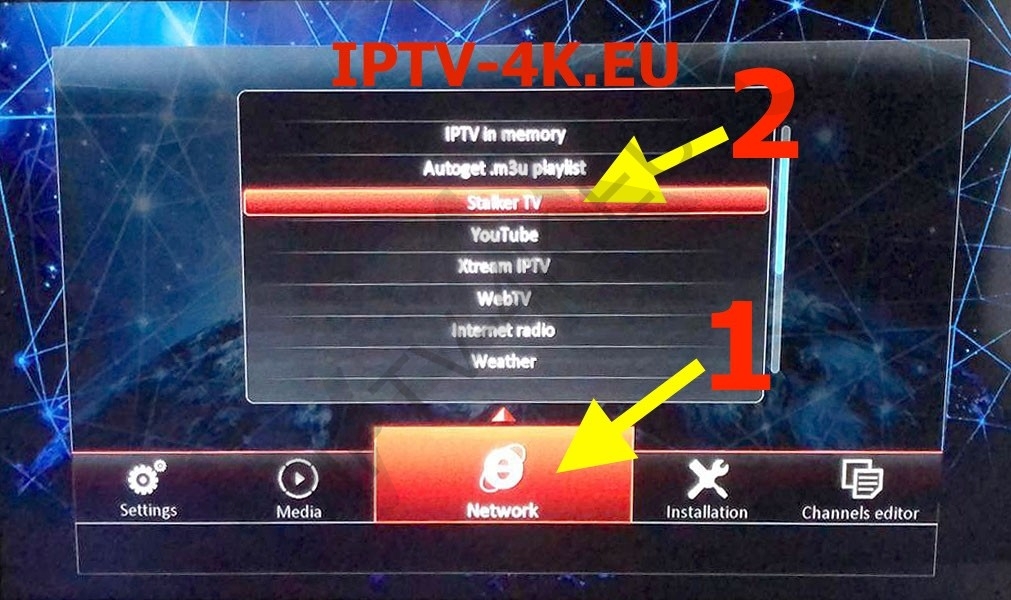
- Here you fine the mac adres that you send to us with your order.
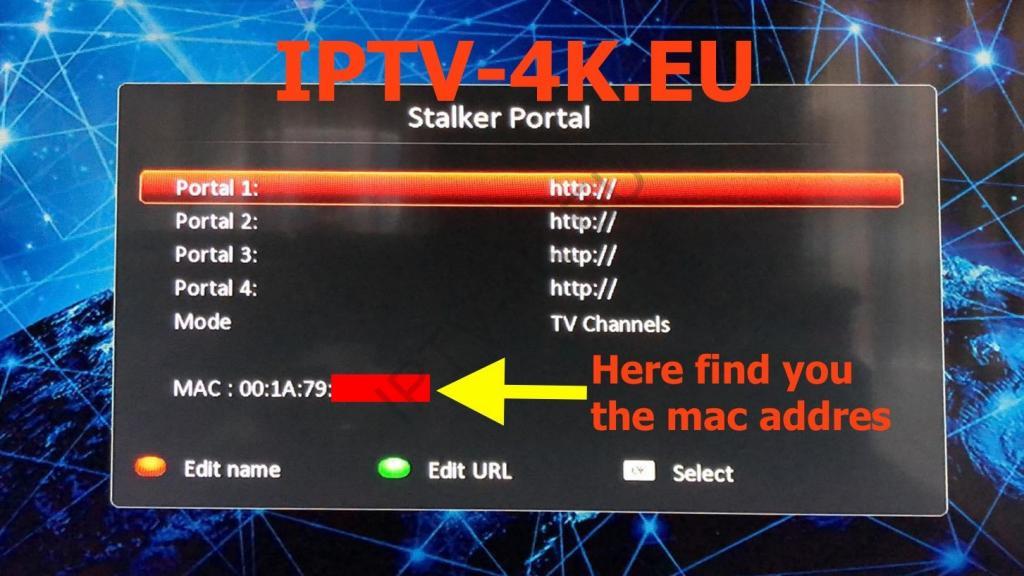
- Go to Portal 1 and press the GREEN button in your remonte controle to edit the URL.
- Enter your portal URL (Check your activation e-mail).
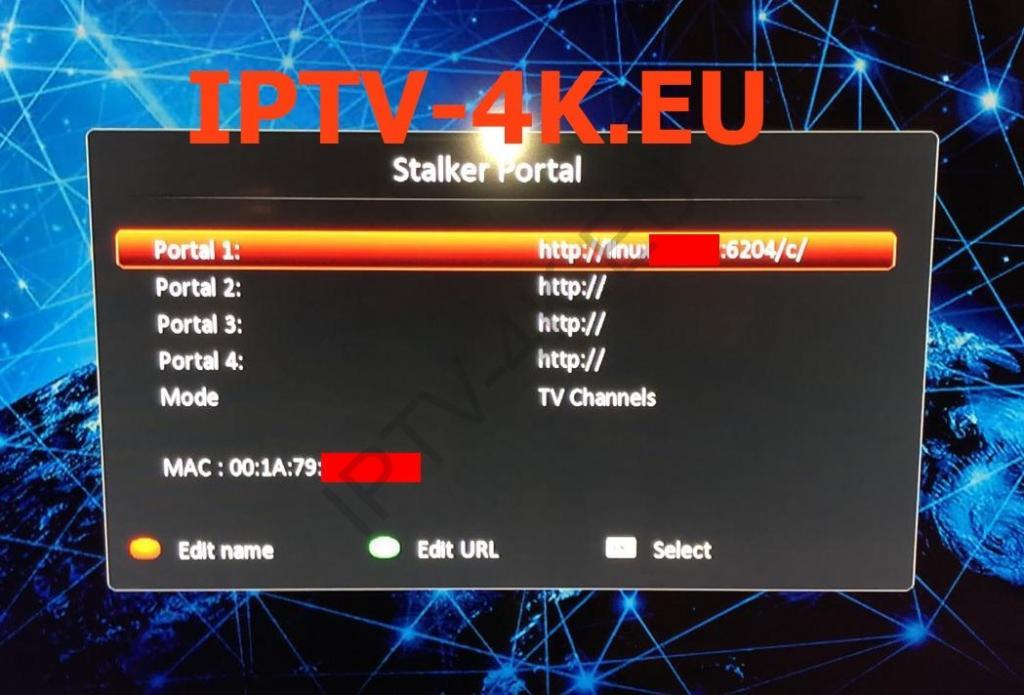
- Exit, and the portal has been saved
- Restart your Octagon box and enjoy.

Troubleshooting Octagon Box
If you have any problems viewing the Channels please follow this recommended fix:
Restart yourOctagon BOX and Modem (Router).
This box works in the same way as the Mag box (Stalker Portal).
This video tutorial will guide you through the simple setup instruction for TVIP Box.
How to put several portals in V605:
– system > TV > Content source (In my case Web portal) > Setup Web Portal + OK
– portal manager ON
– use web portal: choose one of the 3
– API mode: (in my case MAG)
– Apply
NOW YOU WENT AUTOMATICALLY TO WATCH TV above “YOU TUBE”: push OK on Watch TV. If all is going well you become a blue screen where you can edit and enter several portals.
If after “apply” nothing happen, return to “use web portal” change to an other possibility and “apply”
Sometimes several trys are needed!
More information: https://forum.tvip.ru/viewtopic.php?f=6&t=1141&hilit=2+portals&sid=b4174cc9bc7b550a52672614abe63a9c
Troubleshooting TVIP Box
If you have any problems viewing the Channels please follow this recommended fix:
Restart yourTVIP Box and modem (Router).
This tutorial will guide you through the simple setup instruction for Openbox.
Openbox Setup Instructions:
- Open ‘Intenet Browser’.
- Copy and paste your M3U URL into the ‘Address bar’ and press ‘Enter’.
- It will ask you to either ‘save’ or ‘save as’.
- Choose ‘save as’ and change the file name to ‘IPTV4K’.
- Copy the saved file from your computer to a USB stick then put the stick in the Back of the Openbox.
- On the remote press the following:
– MENU
– Network Local settings
– Network App
– WebTV
– Yellow button to read from USB
– Start Watching right after Openbox says ‘success”
Troubleshooting Openbox
If you have any problems viewing the Channels please follow this recommended fix:
Restart your Openbox and Wi-Fi Router.
This tutorial will guide you through the simple setup instruction for STB Emulator.
‘STB Emulator’ can emulate the following IPTV set-top boxes.
| IPTV Set-top Box | Support |
|---|---|
| MAG 200 | Yes |
| MAG 245 | Yes |
| MAG 250 | Yes |
| MAG 260 | Yes |
| MAG 270 | Yes |
| MAG 275 | Yes |
| Aura HD | Yes |
STB Emulator Setup Instructions:
- Download ‘STB Emulator’ from the Google Play Store here.
- Install and Load the ‘STB Emulator’ app and you will see your ‘MAC address’ on screen.
- Tap near the ‘Top right corner’ and then click ‘Settings’ – the 4th icon from the right.
- Tap ‘Profiles’.
- Tap ‘Test portal’ to modify the existing profile or ‘Add profile’ to start a new one.
- Tap ‘STB Model’.
- Tap ‘MAG 250’ or whichever STB you wish to emulate.
- Tap ‘Portal settings’.
- Enter your ‘Portal URL’ (Check your activation e-mail) and click OK.
- Now tap ‘Screen Resolution’.
- Choose ‘1280×720’ (You can choose higher with internet speed 16+ Mbps).
- Exit the app and restart.
- You will now see your channel list.
Troubleshooting STB Emulator
If you have any problems viewing the Channels please follow this recommended fix:
Restart your App, Device/Box, and Wi-Fi Router.
This is an application that can replace Set Top Box for our service.
No extra hardware required! All you need is a supported network-enabled Smart TV. You can use the application just like you would the Set Top Box using your TV’s remote.
Download from your’s TV market application named Smart STB
Register on https://smart-stb.net
Use portal: See your email.
Smart-STB application (emulator of “Mag 250” set top box) for Smart TV
Keep in mind, that this application has become paid since 10/30/2016. Price and other information please check on official website: https://smart-stb.net/
To download and install, follow next steps:
1) Enter the app store on your TV.
2) Select the “Search” line and press the input on the remote control.
3) In the search bar, enter “Smart STB” and click “OK”.
4) As a result of the search, select the Smart STB application and press the input on the remote control.
5) The application installation menu opens.
6) When the installation is complete, a message will appear indicating that the installation is complete
Supported systems:
1. Samsung (Tizen) 2. Samsung (Smart TV) 3. LG (Webos) 4. Android (TV, no pen)
Registration on the website of the application developer for access
1) Go to the developer’s site – http://smart-stb.net/
2) Press the register button “Register”.
3) Open the registration form, fill it in and click on the “Register” button.
4) Message will appear on the screen, indicating that an account has been created. You must confirm your e-mail address, specified during registration.
5) Check your email and open an email from Smart-STB.net, then follow the confirmation link according the instructions.
Application activation (purchase)
1) On the http://smart-stb.net/ website, click Sign In to sign in to your account.
2) Enter your email, password and click “Sign in”.
3) On the opened page, click “Get access”.
4) Enter the MAC address of the active connection, address of the portal (See your email), then click the “Order now” button.
Attention! If your TV is connected through a wired (Beter and more stable than WiFi) connection, you enter LAN MAC address. If via Wi-Fi, then the MAC address of Wi-Fi.
The MAC addresses can be checked on TV in the “Settings” / “Network” / “Network status”.
5) Click to shopping cart.
6) In the shopping cart you will see the product that was selected. Click on “Checkout” to proceed.
7) To check the activation, click “Services”.
8) The “Status” column should have status “Active”.
Buy IPTV subscription
You can buy a IPTV subscription from our SHOP
Or you can also 24 hours test it HERE.
Please send us with order the Virtual Mac Address.
What is my Virtual MAC address?
Your Virtual MAC address has the format XX:XX:XX:XX:XX:XX. The Xs can be numbers 0-9 and letters A-F. Example: 00:1A:79:XX:XX:XX.
How to find out my Smart STB’s Virtual MAC address? Click HERE
Launching the application for viewing.
1) Run application.
2) “Loading portal …” appears on the screen. Press the “Menu” or “OK” (“Enter”) button on the remote control.
3) In opened settings menu select “System settings”.
4) In the “System settings” go to “Portal”.
5) In the “Portal” settings, specify the name in the “Portal 1 name” field (for example: IPTV4K) and the portal address in the “Portal 1 URL” field. The address of the portal should be entered (See your email)
6) Exit the “Portal” and select “Restart”.
7) “Loading Portal” and the download bar will appear alternately on the screen.
8) A window for entering login and password will open. Enter your details and click “OK” on the TV screen.
9) The TV viewing menu opens.
Handleiding Prixon P9 – Portal invoeren
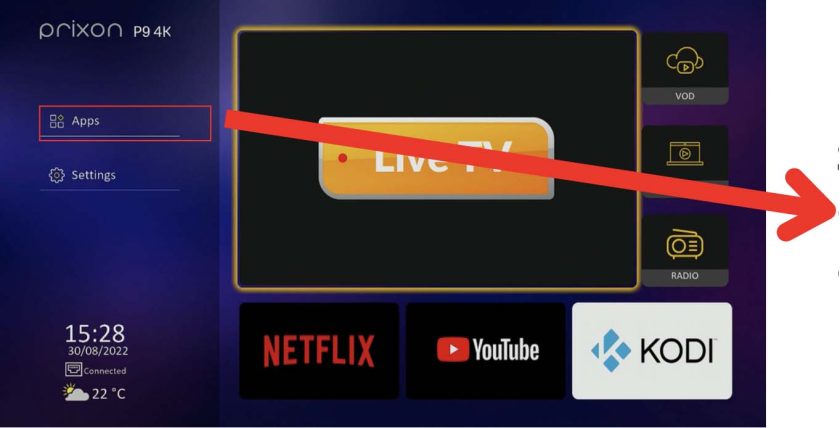
Stap 1. Ga naar het beginscherm en klik op Apps Stap
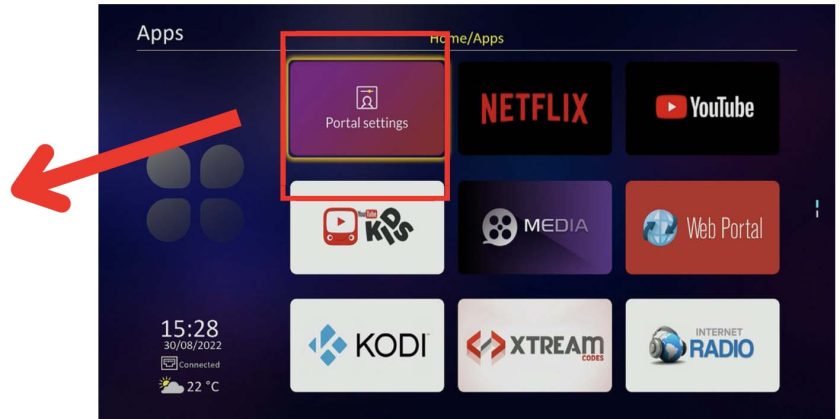
2. Klik op portal settings. Portal invoeren
Stap 3. Voer de Portal url in (zie je activatie email).
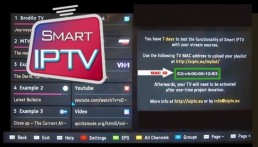
Smart IPTV
INSTALLEER & GENIET
Let op: Op 1-6-2019 Samsung heeft de app uit de Apps Store opgeschort. Kijk even hier de oplossing:
In 6 simpele stappen:
Stap 1: Ga naar uw applicatie store.
Stap 2: Selecteer de rubriek: Voor Android Google play (Video category),
LG Apps Store (Entertainment category).
Stap 3: Download de app ‘Smart IPTV’ (Tips: Als uw Smart IPTV app kan niet in uw aap store TV vinden dan probeer andere apps zoals; SSIPTV, IPTV Smarters Pro of GSE Smart IPTV Pro apps. Ze hebben een andere simple instructie en geen mac adres nodig zoals Smart IPTV app. Kijk onze tutorial pagina.
Stap 4: Er verschijnt een mac address, zoals in de afbeelding weergegeven.
Stap 5: Bestel een test IPTV 24 uur via deze link: https://iptv-4k.co/product/smart-iptv-24-uur/ daar kunt u uw mac adres invullen en de bestelling afronden. Na een succesvolle bestelling krijgt u binnen 2 uur een email bevestiging. Na deze mail is uw IPTV geactiveerd.
Stap 6: Restart de Smart IPTVapp en u kunt genieten van uw aankoop.
TIPS: Druk in de zenderlijst op de blauwe knop van uw afstandsbediening om de group (land) te selecteren
Druk op de groene knop op uw afstandsbediening voor de EPG (TV Gids)
Belangrijk:
– De Smart IPTV app is een 7 dagen proefversie (trial version). U kunt deze zelf activeren voor €5,49 via https://siptv.app/activation . De Smart IPTV app activation is niet inbegrepen in alle IPTV abonnementen.
– Na succesvol activeren, vragen wij u om uw mac adres te beveiligen Dan kan niemand uw zenders verwijderen zonder uw code. Klik hier voor meer informatie.
Lukt het niet? Medewerkers van onze helpdesk helpen u graag!
100% installatie garantie!
Internet
Enkel een internetverbinding
Minimale internetsnelheid is 4 Mb/s
De Smart TV kan zowel via Wifi als met een internet kabel verbonden zijn
Kosten
€14.99 voor 1 maand; €19.99 voor 3maanden; €29.99 voor 6 maanden en €49 voor 12 maanden.
Eenmalige investering in Smart IPTV applicatie á €5,49
U zit nergens aan vast! Geen onvoorziene kosten! Geen stilzwijgende verlengingen! U bepaalt wij draaien!
Altijd & Overal
Alles onder één dak!
U werkt enkel met de afstandsbediening van uw TV!
Lekker makkelijk in gebruik, download & play!
Automatische zenderupdate
Alle zenders worden helemaal gratis automatische update.
Zenderlijst sorteren
Gebruikersvriendelijk vanwege de zenderlijst is gesorteerd volgens land/genre
Hulp bij installatie
Onze helpdesk staat 24/7 voor al uw vragen klaar. Wij leveren al onze producten met 100% installatie garantie.
HomePage
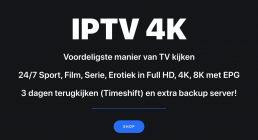
IPTV 4K
U betaalt slechts €50 voor 1 jaar IPTV abonnement .
Goedkoper TV kijken is onmogelijk met onze IPTV en cccam/oscam!
Alle worldwide zenders inclusief de volgende betaalpakketten:
- World Cup Pakket
- VIAPLAY pakket
- Formule 1 pakket
- MOTOGP Pakket
- FIGHTBOXING PAKKET (GLORY TV)
- Pay Per View PPV pakket
- Horse Racing pakket
- Sport pakket
- Films pakket
- Kinder pakket
- Hindi pakket
- VOD pakket
- Adult pakket
- 3 dagen terugkijken (TimeShift)


Channels are easy to choose and always accessible!
Wat zijn uw voordelen?
Wat zijn uw voordelen?
Alle zenders, inclusief alle betaalzenders in Full HD en 4K
24/7 films en sport
Uw huidige tv-abonnement kunt u opzeggen
Geen dure tv abonnementen bij uw huidige tv provider
Enige vereiste is internet
Overal ter wereld tv kijken
Plug & Play
Groepen van ons IPTV pakket
Zonder meerprijs leverbaar!
Groepen van ons IPTV pakket
Zonder meerprijs leverbaar!
* We bieden verschillende IPTV pakketen. You can test them from our webshop
LIVE TV GROUPS (+More):
FORMULA 1, HORSE RACING, NEDERLAND, BELGIUM, GERMANY, AFGHANISTAN, AFRICA, ALBANIA, ARABIC, ARMENIA, AUSTRALIA, AUSTRIA, AZERBAIJAN, BULGARIA, CANADA ENGLISH, CANADIAN FRENCH, CAREBBEAN, CHINA, CZECH, DENMARK, EXYU, FINLAND, FRANCE, GEORGIA, GREECE, HUNGARIAN, HONG KONG, INDIAN/PAKISTAN (EU), INDIAN/PAKISTAN ASIA, INDONESIA, IRAN, ISRAEL, ITALIAN, JAPAN, KOREA, KURDISH, LATIN (Argentina, Vrazil, Colombia, Cuba, Dominican Republic, Chile, Ecuador, Peru, Panama, Uruguay, Venezuela, Mexico), MALAYSIA, MALTA, NEPAL, NORWAY, NEW ZEALAND, PHILIPPINE, POLONIA, PORTUGAL, RADIO, ROMANIA, RUSSIA, SOMALIA, SURINAM, SPAIN, SWEDEN, SWITZERLAND, TAIWAN, THAILAND, TURKISH, UKRAIN, UNITED-KINGDOM, UNITED-STATES, VIETNAM, Adult pakket
VOD GROUPS (+More):
ARABIC VOD, BOLLYWOOD VOD, BULGARY VOD, CZECH REPUBLIC VOD, ENGLISH VOD, EXYU VOD, FRANCE VOD, GERMANY VOD, GREECE VOD, IRAN VOD, ITALY VOD, MALTA VOD, NEDERLAND VOD, POLAND VOD, PORTUGAL-BRAZIL VOD, RUSSIA VODSCANDINAVIA VOD, SOMALIA VOD, SPAIN VOD, TURKISH VOD, ALBANIA.
IPTV werkt op alle apparaten
Onze IPTV pakket werkt op alle Smart IPTV, IPTV Box, mobile, tablet. Kijk even hier voor meer informatie Tutorial
Hulp bij installatie
Onze helpdesk staat 24/7 voor al uw vragen klaar. Wij leveren al onze producten met 100% installatie garantie.
EPG & TimeShift
Onze IPTV pakket heeft EPG en 3 dagen terugkijken (TimeShift). Zo uw favourite TV programma niet meer missen!
IPTV Box kopen
Dan koop onze IPTV box die 100% met onze IPTV werkt zonder probleem! Kijk even hier
Internet
Het enige vereiste is internet met een snelheid van minimaal 8 Mb/s
Bespaar nu!
Uw huidige tv abonnement kunt u opzeggen. Stap nu over op de goedkoopste manier van tv kijken!
Privacy Policy
Algemene Voorwaarden
Doorlezen voor afrekenen!
TV service is een mooie betaalbare aanvulling, maar geen volwaardige vervanger voor reguliere TV. TV service is over het algemeen minder stabiel en het wegvallen van zenders of haperingen komt wel eens voor, vaak door externe factoren waarop wij geen invloed hebben.
Dit is normaal in de TV service-wereld. Gelukkig ontvangen wij hier relatief bijna geen klachten over, maar het is toch even belangrijk om dit door te lezen. Wij willen namelijk geen verkeerde verwachtingen creëren. Wij proberen altijd te leveren binnen 24 uur, vaak ontvangt u uw bestelling al binnen enkele uur.
- NO REFUNDS / GEEN REFUNDS – IPTV-4K zal GEEN gelden voor abonnementen restitueren. U bent vrij om een korte periode te testen alvorens u een langere periode bij ons besteld. Wij willen u erop attenderen dat wij ook een Prepaid Maand pakket bieden, zo zit je niet aan ons vast voor langere tijd.
- Storingen melden uitsluitend via het formulier op de website. Alle meldingen worden ontvangen en op de achtergrond in behandeling genomen.
- Wij kunnen niet garanderen dat zenders gedurende uw abonnement blijven werken. Dit is het risico van TV service. Als je dit risico niet wilt lopen, is IPTV niet voor u. Uiteraard doen wij ons best om klanten tevreden te houden.
- Een internet verbinding van minimaal 50 Mb/s en 100 Mb/s is aanbevolen voor apparaat (niet gedeeld) en moet stabile zijn. Een internet kabel heeft voorkeur over WiFi want WiFi is niet stabile.
- Jouw account is prepaid en je betaalt ons vooraf, je zit niet vast aan een abonnement of automatische incasso.
- Uw account is persoonlijk en mag niet gedeeld worden met derden. Je kunt slechts op 1 apparaat tegelijk kijken. Voor extra apparaten kun je extra accounts bestellen.
- Als u een IPTV URL PORTAL (Stalker Portal) besteld, ontvangt u geen URL M3U link want ze zijn andere activatie methode maar het kan wel een keer voor je omzetten.
- U heeft onze dienst 1 day mogen bestellen en proberen. U bent positief overtuigd en heeft de test werkend gekregen op uw apparaat voordat je je bestelling plaatst.
- Stuur ons geen mails als een zender even niet werkt, dit hoort bij TV service. Wij doen hier niets mee en deze gaan rechtstreeks de prullenbak in. Aanhoudende storingen kun je melden via het contactformulier. Check altijd eerst je eigen internetverbinding.
- Wijzigingen in de zenderlijst onder voorbehoud. Niet werkende zenders zijn geen reden voor een klacht. Als de problemen langdurig (~7 dagen) aanhouden kun je contact met ons opnemen en gaan wij uitzoeken wat hiervan de oorzaak zou kunnen zijn.
- We doen ons best om je te laten genieten van een goed aanbod. Echter kunnen wij niet garanderen dat 100% van de zenders blijven werken. Ook externe factoren kunnen hier invloed op hebben. GEEN REFUNDS.